- Published on
Upload images to Cloudinary with React
- Authors

- Name
- Andreas Keller
- @itsakeller
Cloudinary is a cloud service that offers a solution to a web application's entire image management pipeline. Easily upload images to the cloud. Automatically perform smart image resizing, cropping and conversion without installing any complex software.
In this tutorial we will learn how to use and upload images to Cloudinary in a React application.
Sign up for Cloudinary
To get startet with Cloudinary register a free account by visiting https://cloudinary.com/users/register/free.
After validating your email address you are good to go.
Different options to upload images
You could use Cloudinary's upload widget to easily upload images from your local file system, web address and other sources. But in this tutorial I want to show you how to upload images with their upload endpoint.
The React sample is based on this Codepen and the corresponding blogpost.
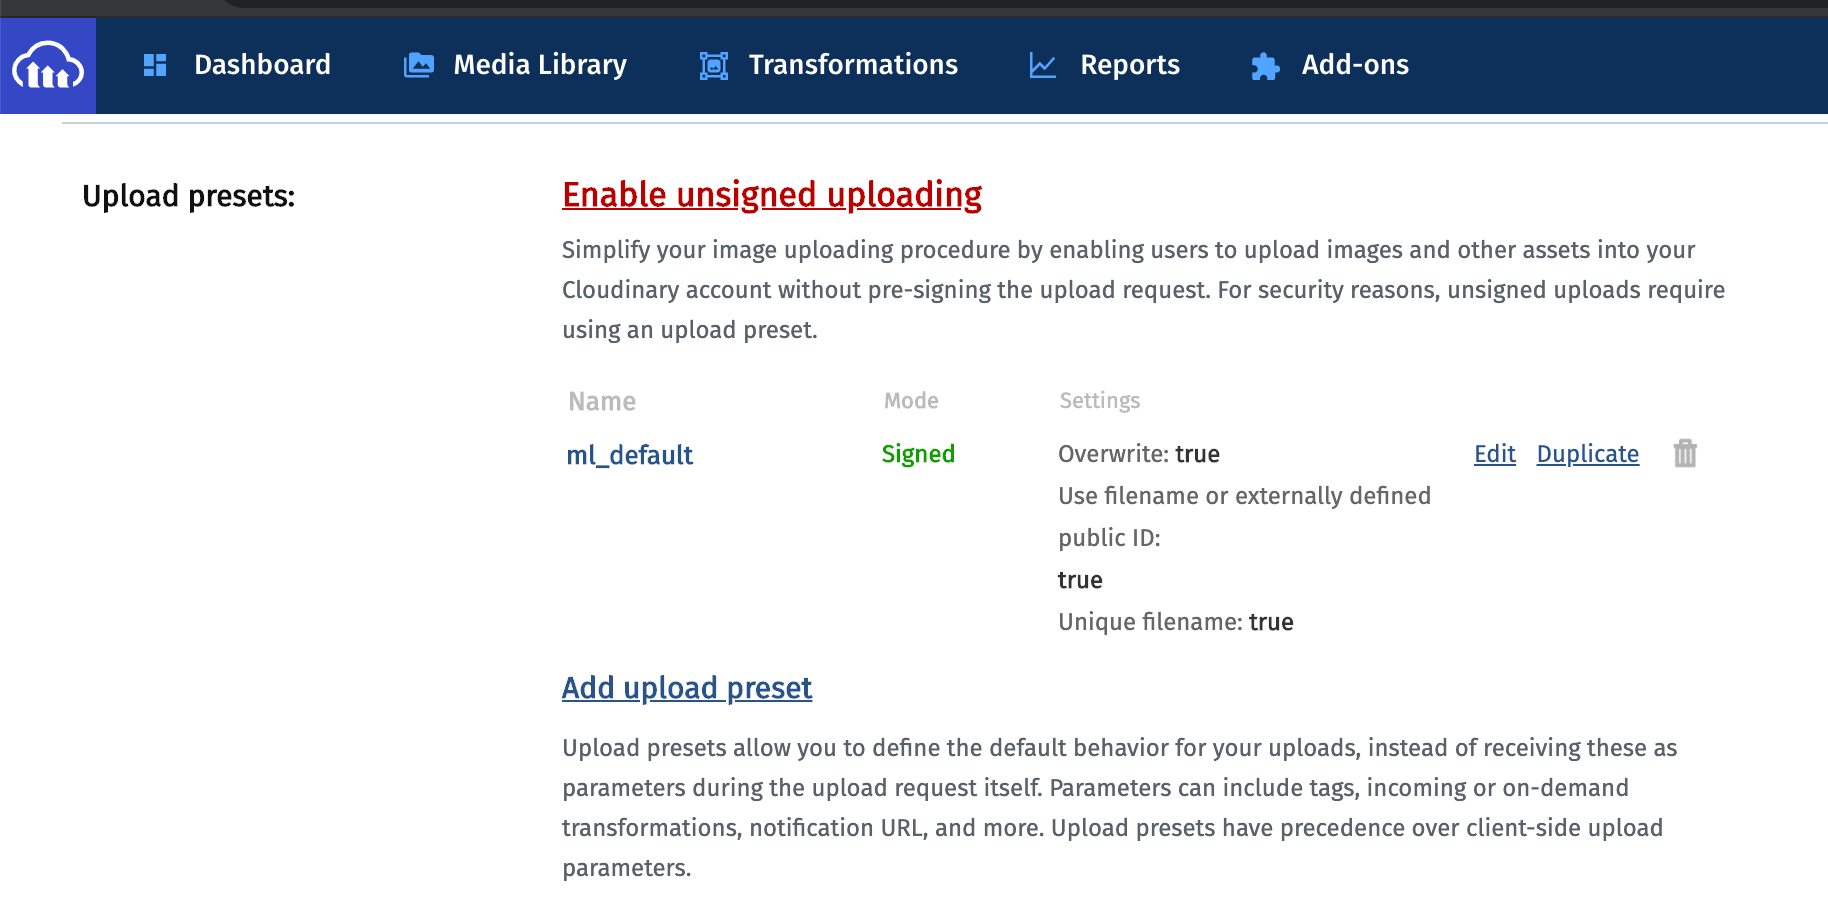
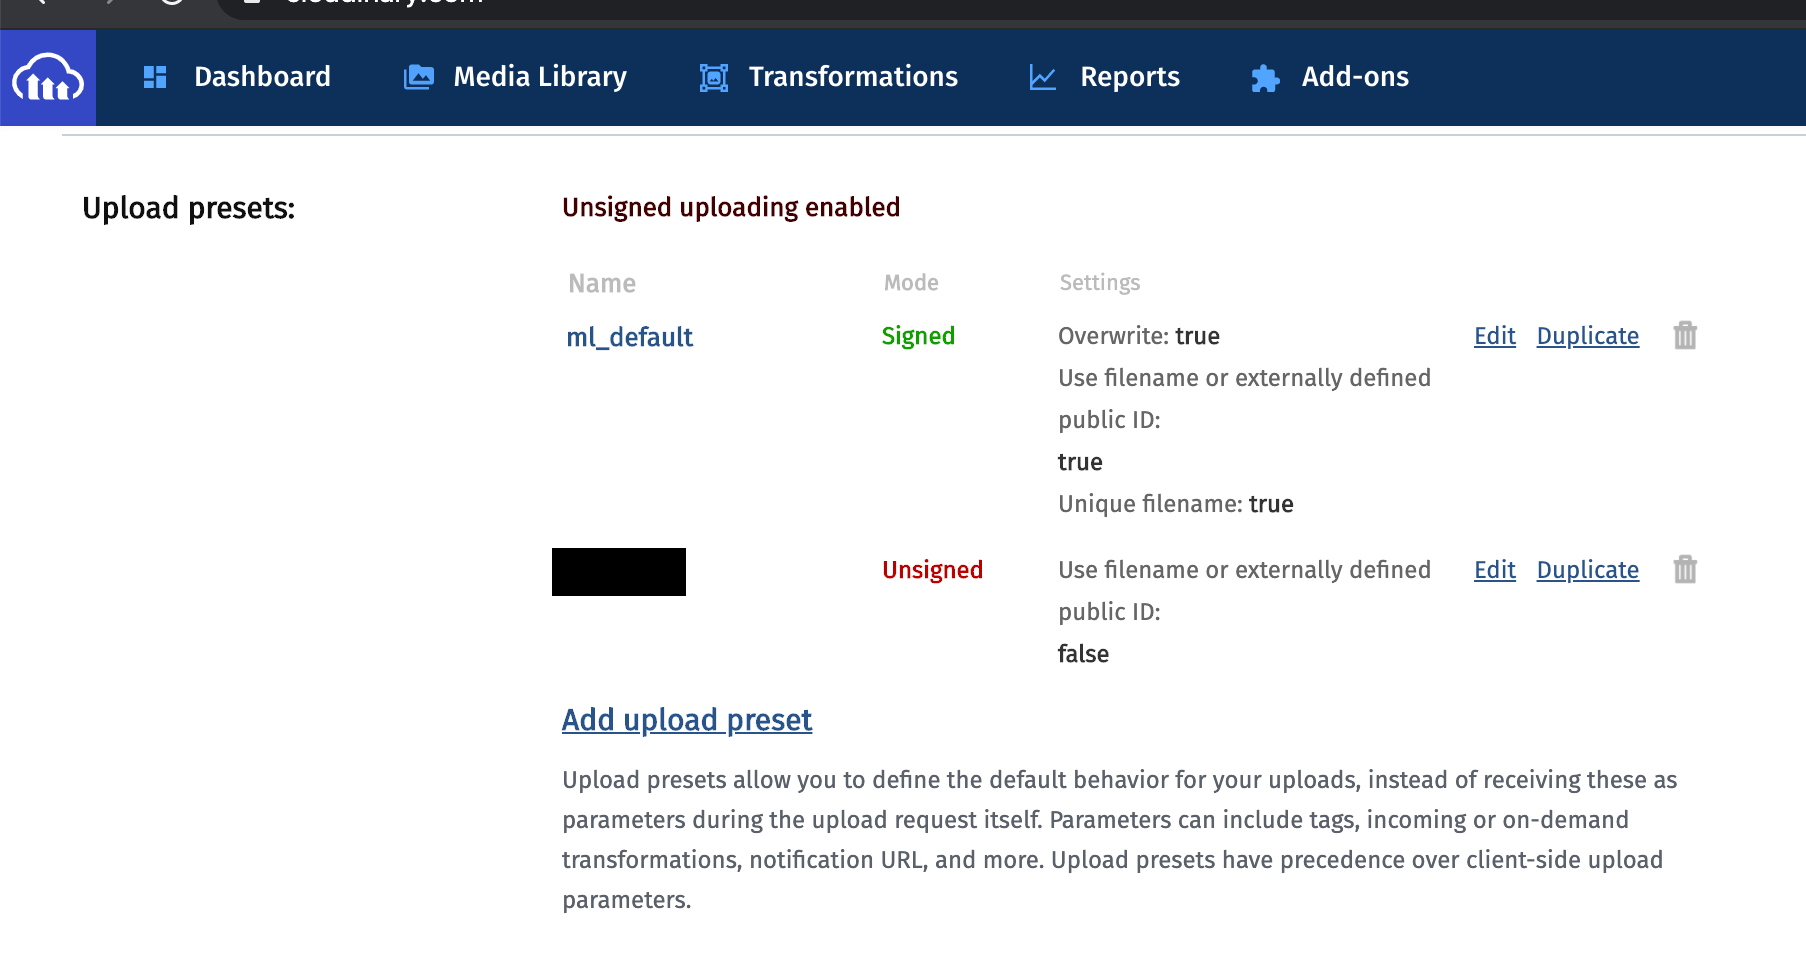
Enable unsigned uploading
You first need to enable unsigned uploading in your Cloudinary account from the Upload settings page.
Clicking Enable unsigned uploading generates a random upload preset which you need to save into your environement variables together with you Cloudinary cloud name.
Setup sample app
We use Next.js and TailwindCSS for our sample app.
We use the with-tailwind example as a starting point. Run this:
npx create-next-app --example with-tailwindcss react-cloudinary
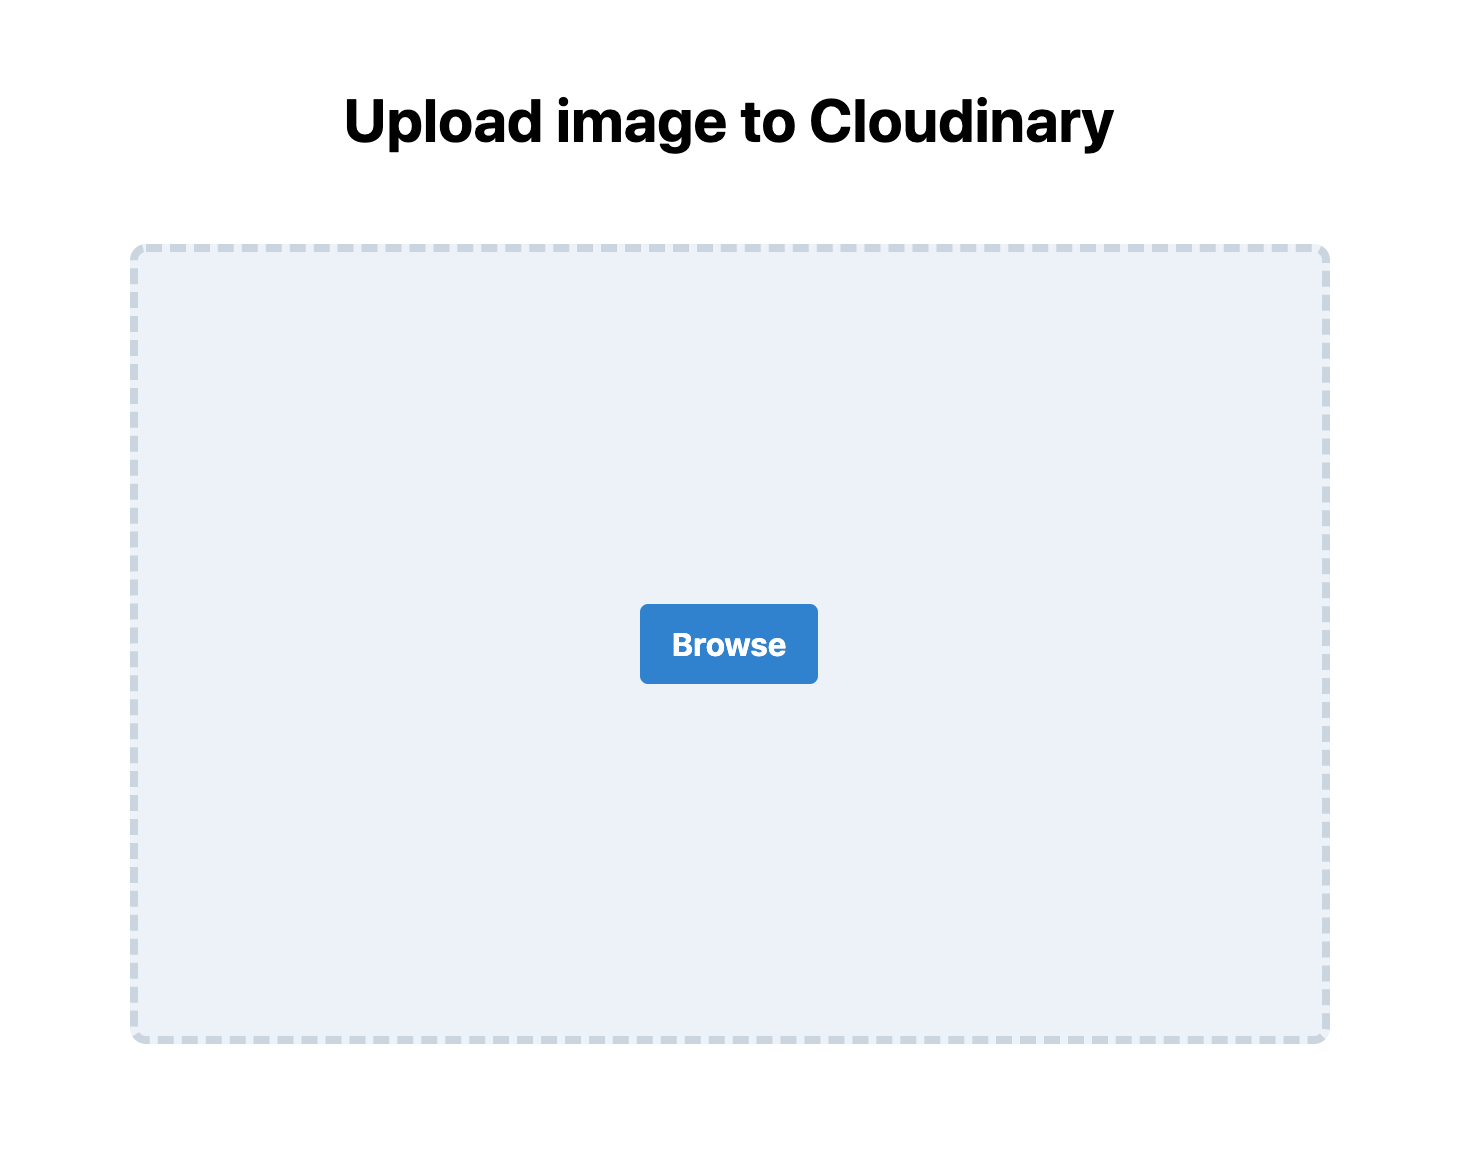
Then create a new file components/image-uploader.js.
import { useRef } from "react";

export default function ImageUploader() {
  const fileSelect = useRef(null);

  async function handleImageUpload() {
    if (fileSelect) {
      fileSelect.current.click();
    }
  }

  function handleFiles(files) {
    for (let i = 0; i < files.length; i++) {
      console.log(files[i]);
    }
  }

  return (
    <div
      className="bg-gray-200 border-4 border-dashed border-gray-400 rounded-lg"
      style={{ height: 400, width: 600 }}
    >
      <form className="flex justify-center items-center h-full">
        <div className="text-gray-700 text-center">
          <button
            className="bg-blue-600 hover:bg-blue-800 text-white font-bold px-4 py-2 rounded block m-auto"
            onClick={handleImageUpload}
            type="button"
          >
            Browse
          </button>
        </div>

        <input
          ref={fileSelect}
          type="file"
          accept="image/*"
          style={{ display: "block" }}
          onChange={(e) => handleFiles(e.target.files)}
        />
      </form>
    </div>
  );
}
At the moment this component displays a box with a button Browse to trigger the file upload. Because styling file inputs is difficult we hide it and display a button instead to trigger the file upload.
The function handleFiles will later upload the images to cloudinary. Right now we simply log the files to the console.
Upload function
For the upload function we need two environment variables: NEXT_PUBLIC_CLOUDINARY_CLOUDNAME and NEXT_PUBLIC_CLOUDINARY_UNSIGNED_UPLOAD_PRESET. We add them to our .env.local file and need to preset the variables with NEXT_PUBLIC to expose them to the browser.
Learn more about environment variables in Next.js here.
With this preparation add the following uploadFile function:
function uploadFile(file) {
  const url = `https://api.cloudinary.com/v1_1/${process.env.NEXT_PUBLIC_CLOUDINARY_CLOUDNAME}/upload`;
  const xhr = new XMLHttpRequest();
  const fd = new FormData();
  xhr.open("POST", url, true);
  xhr.setRequestHeader("X-Requested-With", "XMLHttpRequest");

  // Update progress (can be used to show progress indicator)
  xhr.upload.addEventListener("progress", (e) => {
    setProgress(Math.round((e.loaded * 100.0) / e.total));
    console.log(Math.round((e.loaded * 100.0) / e.total));
  });

  xhr.onreadystatechange = (e) => {
    if (xhr.readyState == 4 && xhr.status == 200) {
      const response = JSON.parse(xhr.responseText);

      setImage(response.secure_url);
      console.log(response.secure_url);
    }
  };

  fd.append(
    "upload_preset",
    process.env.NEXT_PUBLIC_CLOUDINARY_UNSIGNED_UPLOAD_PRESET
  );
  fd.append("tags", "browser_upload");
  fd.append("file", file);
  xhr.send(fd);
}
This function uses the Cloudinary API endpoint upload with our cloud name and the unsigned upload preset.
We call the function for every selected file in our handleFiles function.
function handleFiles(files) {
  for (let i = 0; i < files.length; i++) {
    console.log(files[i]);
    uploadFile(files[i]);
  }
}
We use XMLHttpRequest instead of fetch for our POST request, because fetch does not support getting a progress indicator back.
To store the current upload progress and the uploaded image we need to add two useState hooks.
const [image, setImage] = useState(null);
const [progress, setProgress] = useState(0);
Our components/image-uploader.js file now looks like this:
import { useRef, useState } from "react";

export default function ImageUploader({ defaultImage }) {
  const fileSelect = useRef(null);
  const [image, setImage] = useState(defaultImage);
  const [progress, setProgress] = useState(0);

  async function handleImageUpload() {
    if (fileSelect) {
      fileSelect.current.click();
    }
  }

  function handleFiles(files) {
    for (let i = 0; i < files.length; i++) {
      console.log(files[i]);
      uploadFile(files[i]);
    }
  }

  function uploadFile(file) {
    const url = `https://api.cloudinary.com/v1_1/${process.env.NEXT_PUBLIC_CLOUDINARY_CLOUDNAME}/upload`;
    const xhr = new XMLHttpRequest();
    const fd = new FormData();
    xhr.open("POST", url, true);
    xhr.setRequestHeader("X-Requested-With", "XMLHttpRequest");

    // Update progress (can be used to show progress indicator)
    xhr.upload.addEventListener("progress", (e) => {
      setProgress(Math.round((e.loaded * 100.0) / e.total));
      console.log(Math.round((e.loaded * 100.0) / e.total));
    });

    xhr.onreadystatechange = (e) => {
      if (xhr.readyState == 4 && xhr.status == 200) {
        const response = JSON.parse(xhr.responseText);

        setImage(response.secure_url);
        console.log(response.secure_url);
      }
    };

    fd.append(
      "upload_preset",
      process.env.NEXT_PUBLIC_CLOUDINARY_UNSIGNED_UPLOAD_PRESET
    );
    fd.append("tags", "browser_upload");
    fd.append("file", file);
    xhr.send(fd);
  }

  return (
    <>
      {image ? (
        <img
          className="object-contain rounded-lg"
          src={image.replace("upload/", "upload/w_600/")}
          style={{ height: 400, width: 600 }}
        />
      ) : (
        <div
          className="bg-gray-200 border-4 border-dashed border-gray-400 rounded-lg"
          style={{ height: 400, width: 600 }}
        >
          <form className="flex justify-center items-center h-full">
            {progress === 0 ? (
              <div className="text-gray-700 text-center">
                <button
                  className="bg-blue-600 hover:bg-blue-800 text-white font-bold px-4 py-2 rounded block m-auto"
                  onClick={handleImageUpload}
                  type="button"
                >
                  Browse
                </button>
              </div>
            ) : (
              <span className="text-gray-700">{progress}%</span>
            )}

            <input
              ref={fileSelect}
              type="file"
              accept="image/*"
              style={{ display: "none" }}
              onChange={(e) => handleFiles(e.target.files)}
            />
          </form>
        </div>
      )}
    </>
  );
}
With that we added the ability to upload images to Cloudinary to our React app. We could further improve the upload experience by allowing Drag and Drop.
Uploading images by Drag and Drop
To implement the Drag and Drop functionality we use a useEffect hook which is run only once after mounting the component. We add another DOM reference dropbox with the useRef to a container div. When dropping the files we upload them through calling our handleFiles function.
return <div ref={dropbox}>...</div>;
useEffect(() => {
  function dragEnter(e) {
    e.stopPropagation();
    e.preventDefault();
  }

  function dragOver(e) {
    e.stopPropagation();
    e.preventDefault();
  }

  function drop(e) {
    e.stopPropagation();
    e.preventDefault();

    const dt = e.dataTransfer;
    const files = dt.files;

    handleFiles(files);
  }

  dropbox.current.addEventListener("dragenter", dragEnter, false);
  dropbox.current.addEventListener("dragover", dragOver, false);
  dropbox.current.addEventListener("drop", drop, false);

  return () => {
    dropbox.current.removeEventListener("dragenter", dragEnter);
    dropbox.current.removeEventListener("dragover", dragOver);
    dropbox.current.removeEventListener("drop", drop);
  };
}, []);
Consuming images
The real benefit of uploading images to Cloudinary instead of e.g. Amazon S3 are the integrated image transforming capabilities. To display optimized images you could either use a library like cloudinary-react or just use the URL based Transformation API like in our example above.
Follow along as I'm building yabby.page in public.