- Published on
Use Google Sheets as a CMS for your Next.js blog
- Authors

- Name
- Andreas Keller
- @itsakeller
Recently I had the need to add FAQ's to a simple Next.js landing page without a CMS. The FAQ's needed to be updated by another user, but I didn't want to set up a CMS only for this. So I ended up using Google Sheets and I'm more than happy with the solution. Thanks to Next.js's Incremental Static Regeneration I get a fast static site which still gets updated whenever FAQ's are changed.
In this blog post I show you how to load content from Google Sheets and add it to your Next.js site. You can see a Demo and checkout the code on Github.
Let's get started by setting up the Google Sheets API.
Create a new Google project and credentials
If you don't have a Google account yet, create this account first. Go to https://accounts.google.com and create a free account.
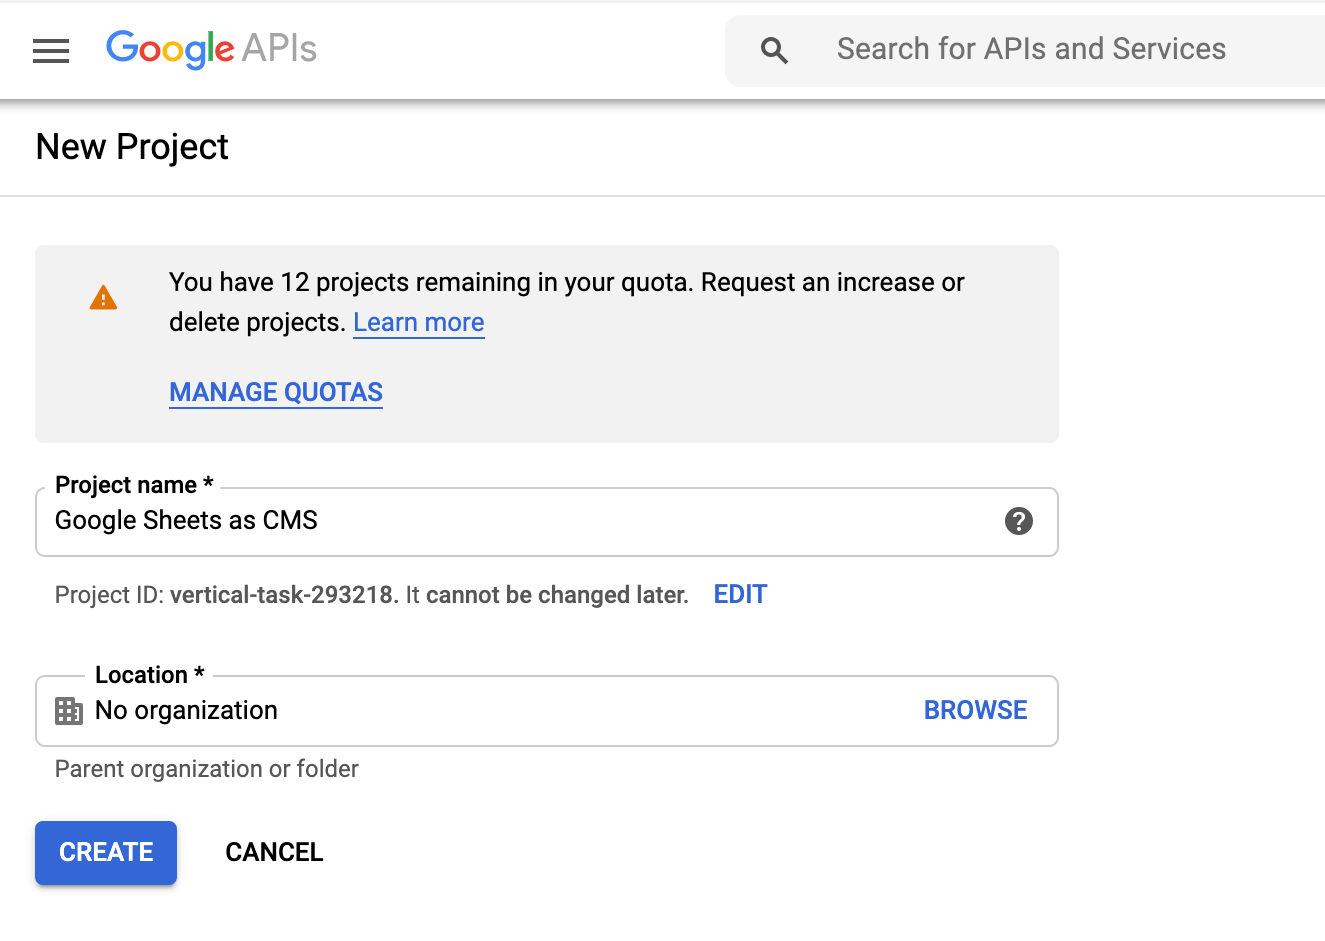
Then go to https://console.developers.google.com/projectcreate to create a new project.
Go to APIs & Services and select Credentials, then Manage Service Accounts.
Click CREATE SERVICE ACCOUNT and give the service account a name. Click DONE.
In the list of your service accounts, click the three bullets under Action and click Create Key. Choose JSON and click CREATE.
Store the created JSON file with your service account credentials somewhere save. We will later on extract the needed fields and save them in our environment variables.
Enable Google Sheets API
To use the Google Sheets API we first need to enable it for this project. Search for Google Sheets in the searchbox. Open the overview page and click the ENABLE button.

Now we should be ready to use Google Sheets API in our code.
Create a Google Sheet
Open this sample sheet and save a copy (File - Make a copy).
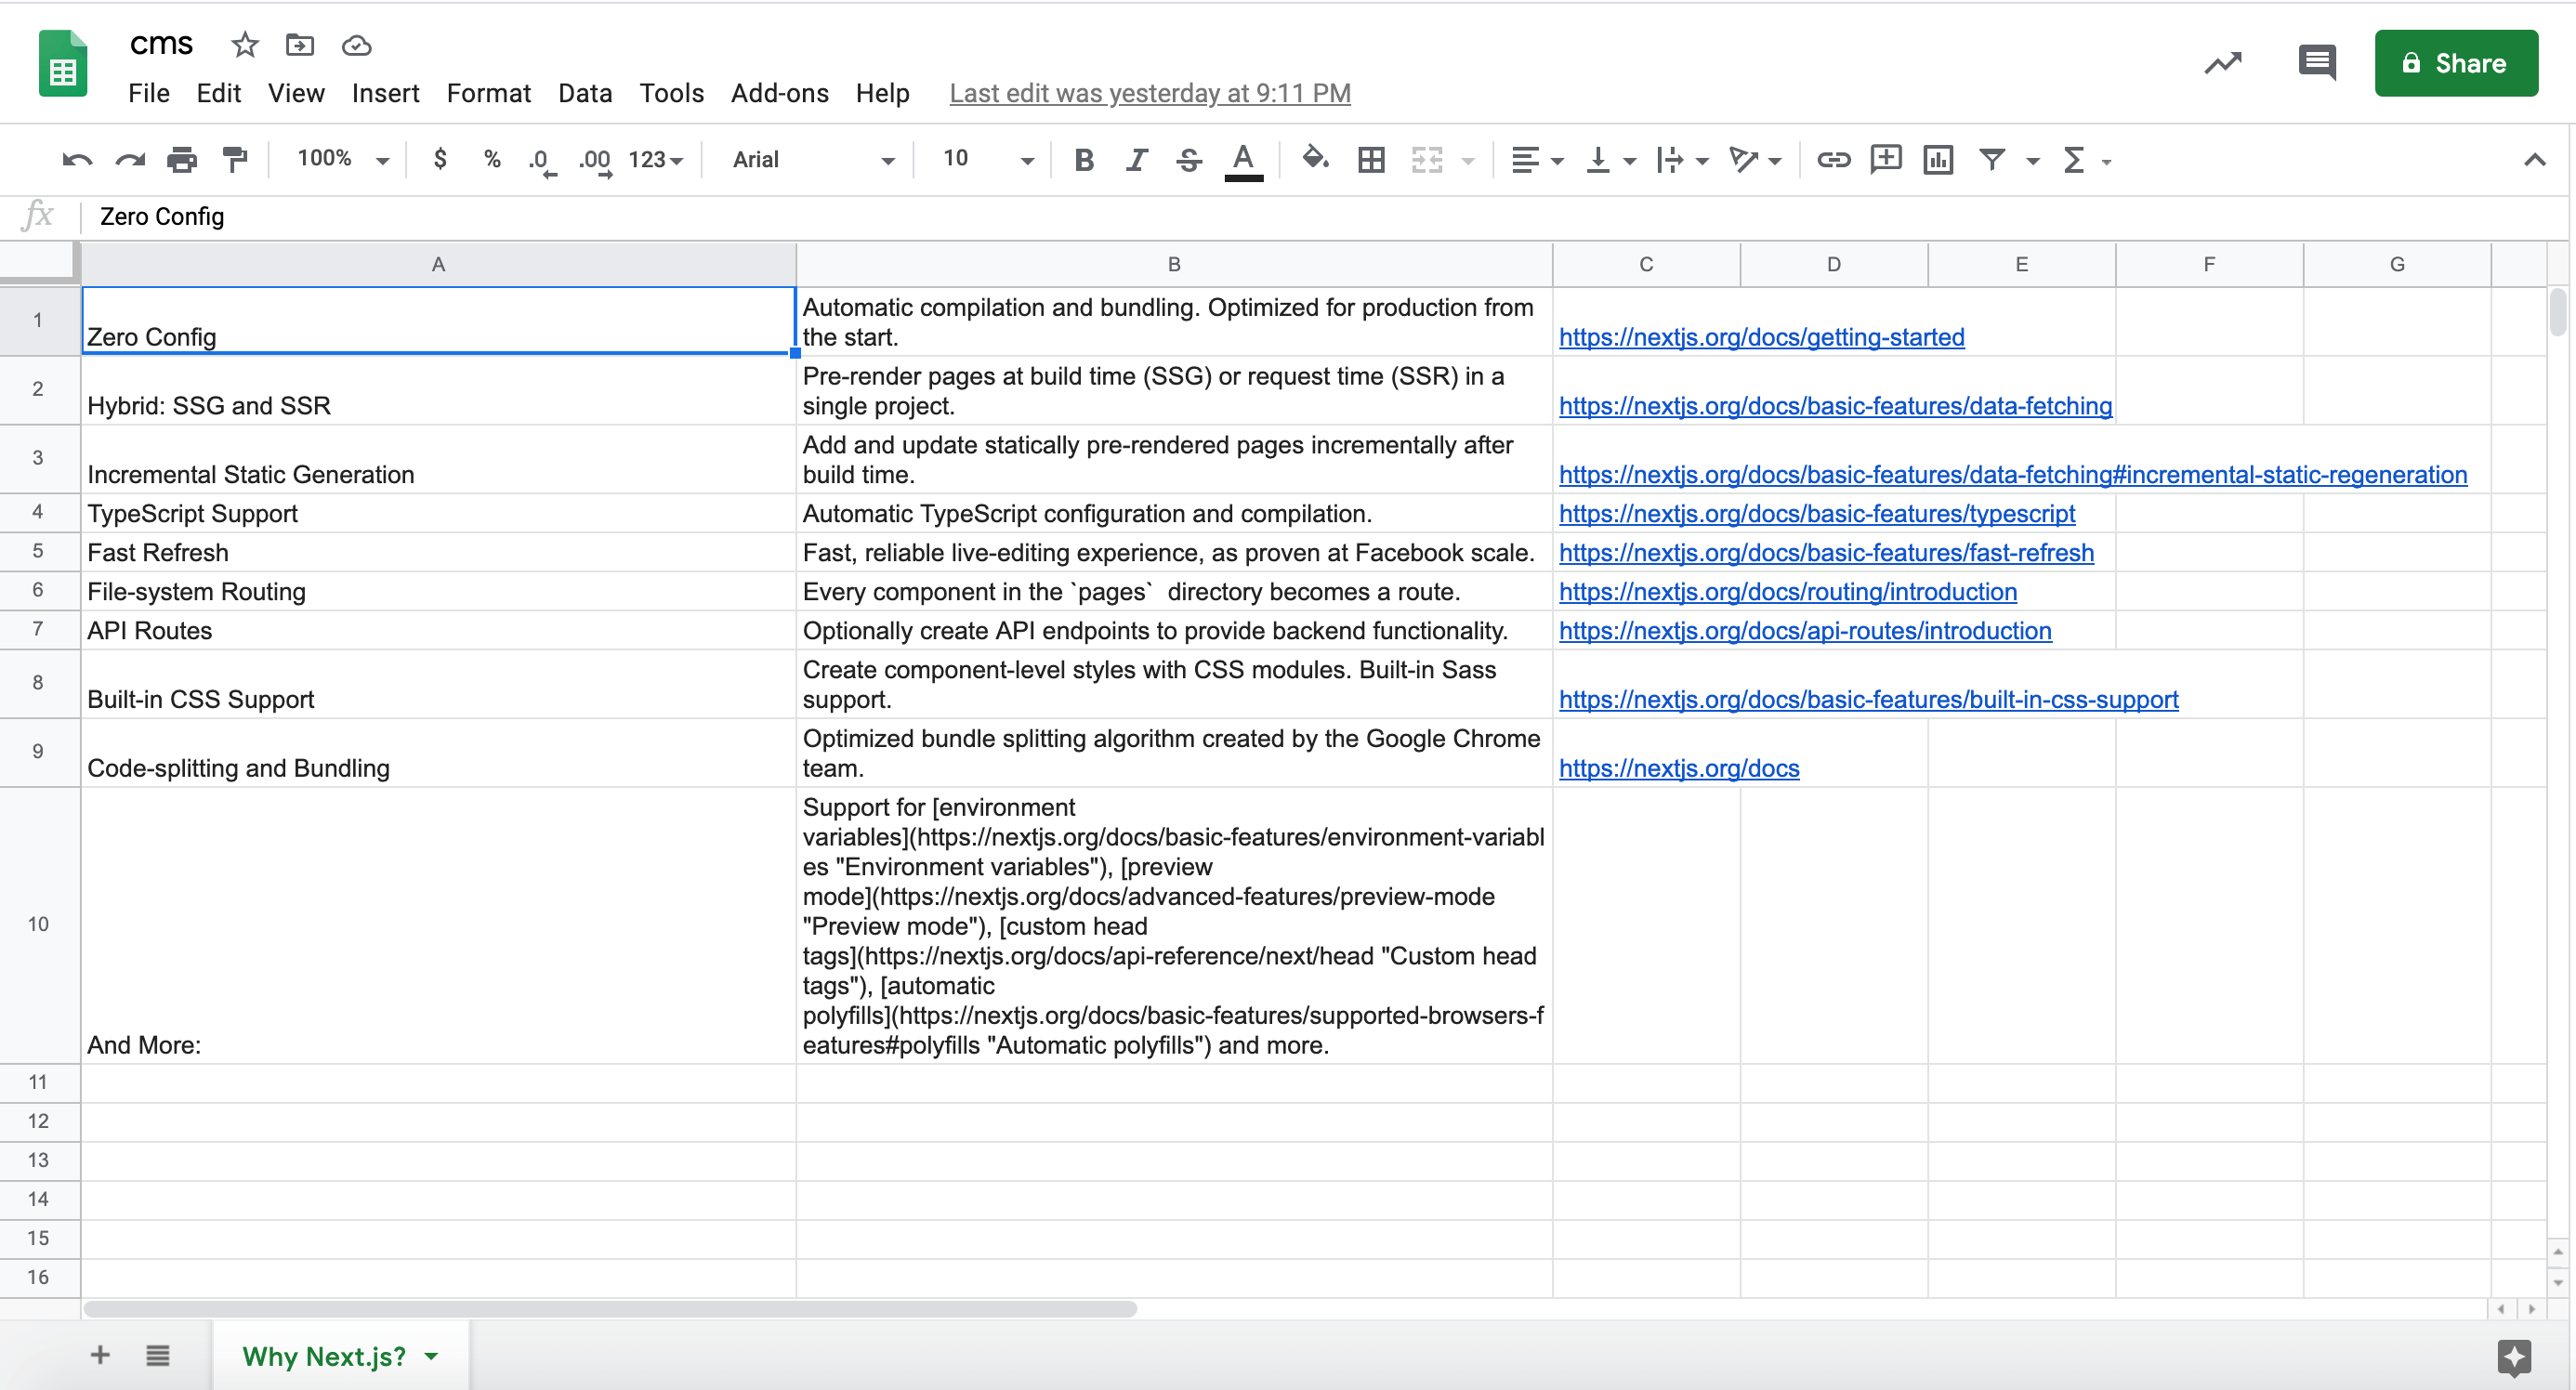
We are rebuilding the reasons listed on the nextjs.org website why Next.js is awesome.
Share Google Sheet with service account
To access our data we need to share our Google Sheet with our service account we created in the previous step. Click the Share button topright, copy the client_email address from your service account JSON file and paste it into the textbox. Select Viewer as permission as we only need to read data.
Setup a new Next.js app
Setup a new Next.js project with Tailwind CSS already configured as we use it to style our app.
yarn create next-app --example with-tailwindcss google-sheets-cms
Setup environment variables
Create a file .env.local and add the two values client_email and private_key from your service accounts file.
GOOGLE_SHEETS_CLIENT_EMAIL=YOUR CLIENT EMAIL
GOOGLE_SHEETS_PRIVATE_KEY=YOUR PRIVATE KEY
It's important to replace the escaped \n characters when reading the private key environment variable like so:
process.env.GOOGLE_SHEETS_PRIVATE_KEY.replace(/\\n/g, "\n");
Create a function to read data from our Google Sheet
To use the Google Sheets API we need to install the library googleapis. Install it by running
yarn add googleapis
Create a folder lib and add a file api.js to it.
import { google } from "googleapis";
import marked from "marked";
const renderer = new marked.Renderer();
renderer.link = (href, title, text) =>
  `<a target="_blank" rel="noopener noreferrer" href="${href}" title="${
    title || ""
  }">${text}</a>`;

export async function getWhyNextReasons() {
  try {
    const scopes = ["https://www.googleapis.com/auth/spreadsheets.readonly"];
    const jwt = new google.auth.JWT(
      process.env.GOOGLE_SHEETS_CLIENT_EMAIL,
      null,
      // we need to replace the escaped newline characters
      // https://stackoverflow.com/questions/50299329/node-js-firebase-service-account-private-key-wont-parse
      process.env.GOOGLE_SHEETS_PRIVATE_KEY.replace(/\\n/g, "\n"),
      scopes
    );

    const sheets = google.sheets({ version: "v4", auth: jwt });
    const response = await sheets.spreadsheets.values.get({
      spreadsheetId: process.env.SPREADSHEET_ID,
      range: "Why Next.js?",
    });

    const rows = response.data.values;

    if (rows.length) {
      return rows.map((row) => ({
        title: row[0],
        description: marked(row[1].replace(/\n/g, "<br />"), { renderer }),
        href: row[2] || null,
      }));
    }
  } catch (err) {
    console.log(err);
  }

  return [];
}
We first need to define the required scopes for our app. In our case we only need read access. We define that with this line:
const scopes = ["https://www.googleapis.com/auth/spreadsheets.readonly"];
Next we need to provide the client email and private key of our service account to generate a JWT (Json Web Token) which we need to initalize the api in the next step.
const jwt = new google.auth.JWT(
  process.env.GOOGLE_SHEETS_CLIENT_EMAIL,
  null,
  // we need to replace the escaped newline characters
  // https://stackoverflow.com/questions/50299329/node-js-firebase-service-account-private-key-wont-parse
  process.env.GOOGLE_SHEETS_PRIVATE_KEY.replace(/\\n/g, "\n"),
  scopes
);
We initialize the Google Sheets API with
const sheets = google.sheets({ version: "v4", auth: jwt });
We use the latest API version 4 and pass our created token.
After that we can load the data with
const response = await sheets.spreadsheets.values.get({
  spreadsheetId: process.env.SPREADSHEET_ID,
  range: "Why Next.js?",
});
We need to provide the Spreadsheet ID and a range. You can get the Spreadsheet ID from the URL of your Google Sheet https://docs.google.com/spreadsheets/d/SPREADSHEET_ID/. The range can be only the Sheet Name (Why Next.js? in our case) or could also further include a selection of rows/columns.
We map the columns to specific fields to make it clearer what data we are reading.
Render markdown
We want to support Markdown for our second column. With Markdown we can format the description or add links.
Install Marked by running
yarn add marked
To open links in a new tab, we change the default link renderer to
const renderer = new marked.Renderer();
renderer.link = (href, title, text) =>
  `<a target="_blank" rel="noopener noreferrer" href="${href}" title="${
    title || ""
  }">${text}</a>`;
With
description: marked(row[1].replace(/\n/g, "<br />"), { renderer }),
we parse our Markdown and compile it into Html for the description field.
Read the Google Sheets data in our index.js file
Next we want to read this data in our index.js file in the getStaticProps function. With using getStaticProps instead of getServerProps we get a fast static site and with Next.js's Incremental Static Regeneration we still get a updated page after data has changed.
Change the default index.js file to this:
import Nav from "../components/nav";
import { getWhyNextReasons } from "../lib/api";

export default function IndexPage({ reasons }) {
  return (
    <div>
      <Nav />
      <div className="container mx-auto py-20 px-8">
        <h1 className="text-5xl text-center text-accent-1 mb-16">
          Why Next.js?
        </h1>

        <div className="grid grid-cols-1 md:grid-cols-2 lg:grid-cols-3 gap-4">
          {reasons
            .slice(0, reasons.length - 1)
            .map(({ title, description, href }) => (
              <a
                className="border border-grey-200 rounded p-4 hover:shadow-lg hover:border-transparent"
                key={title}
                href={href}
                target="_blank"
              >
                <h3 className="font-bold mb-2">{title}</h3>
                <div dangerouslySetInnerHTML={{ __html: description }} />
                <span className="text-blue-600 hover:text-blue-400 hover:underline mt-4 block">
                  Documentation →
                </span>
              </a>
            ))}
        </div>
        <div className="text-center mt-8">
          {reasons.slice(reasons.length - 1).map(({ title, description }) => (
            <div className="markdown inline-p">
              <strong>{title}</strong>{" "}
              <span dangerouslySetInnerHTML={{ __html: description }} />
            </div>
          ))}
        </div>
      </div>
    </div>
  );
}

export async function getStaticProps(context) {
  const reasons = await getWhyNextReasons();

  return {
    props: {
      reasons,
    },
    // Next.js will attempt to re-generate the page:
    // - When a request comes in
    // - At most once every second
    revalidate: 1, // In seconds
  };
}
We load the data from Google Sheets via our function getWhyNextReasons which we defined above in the getStaticProps function and pass it as props to our component.
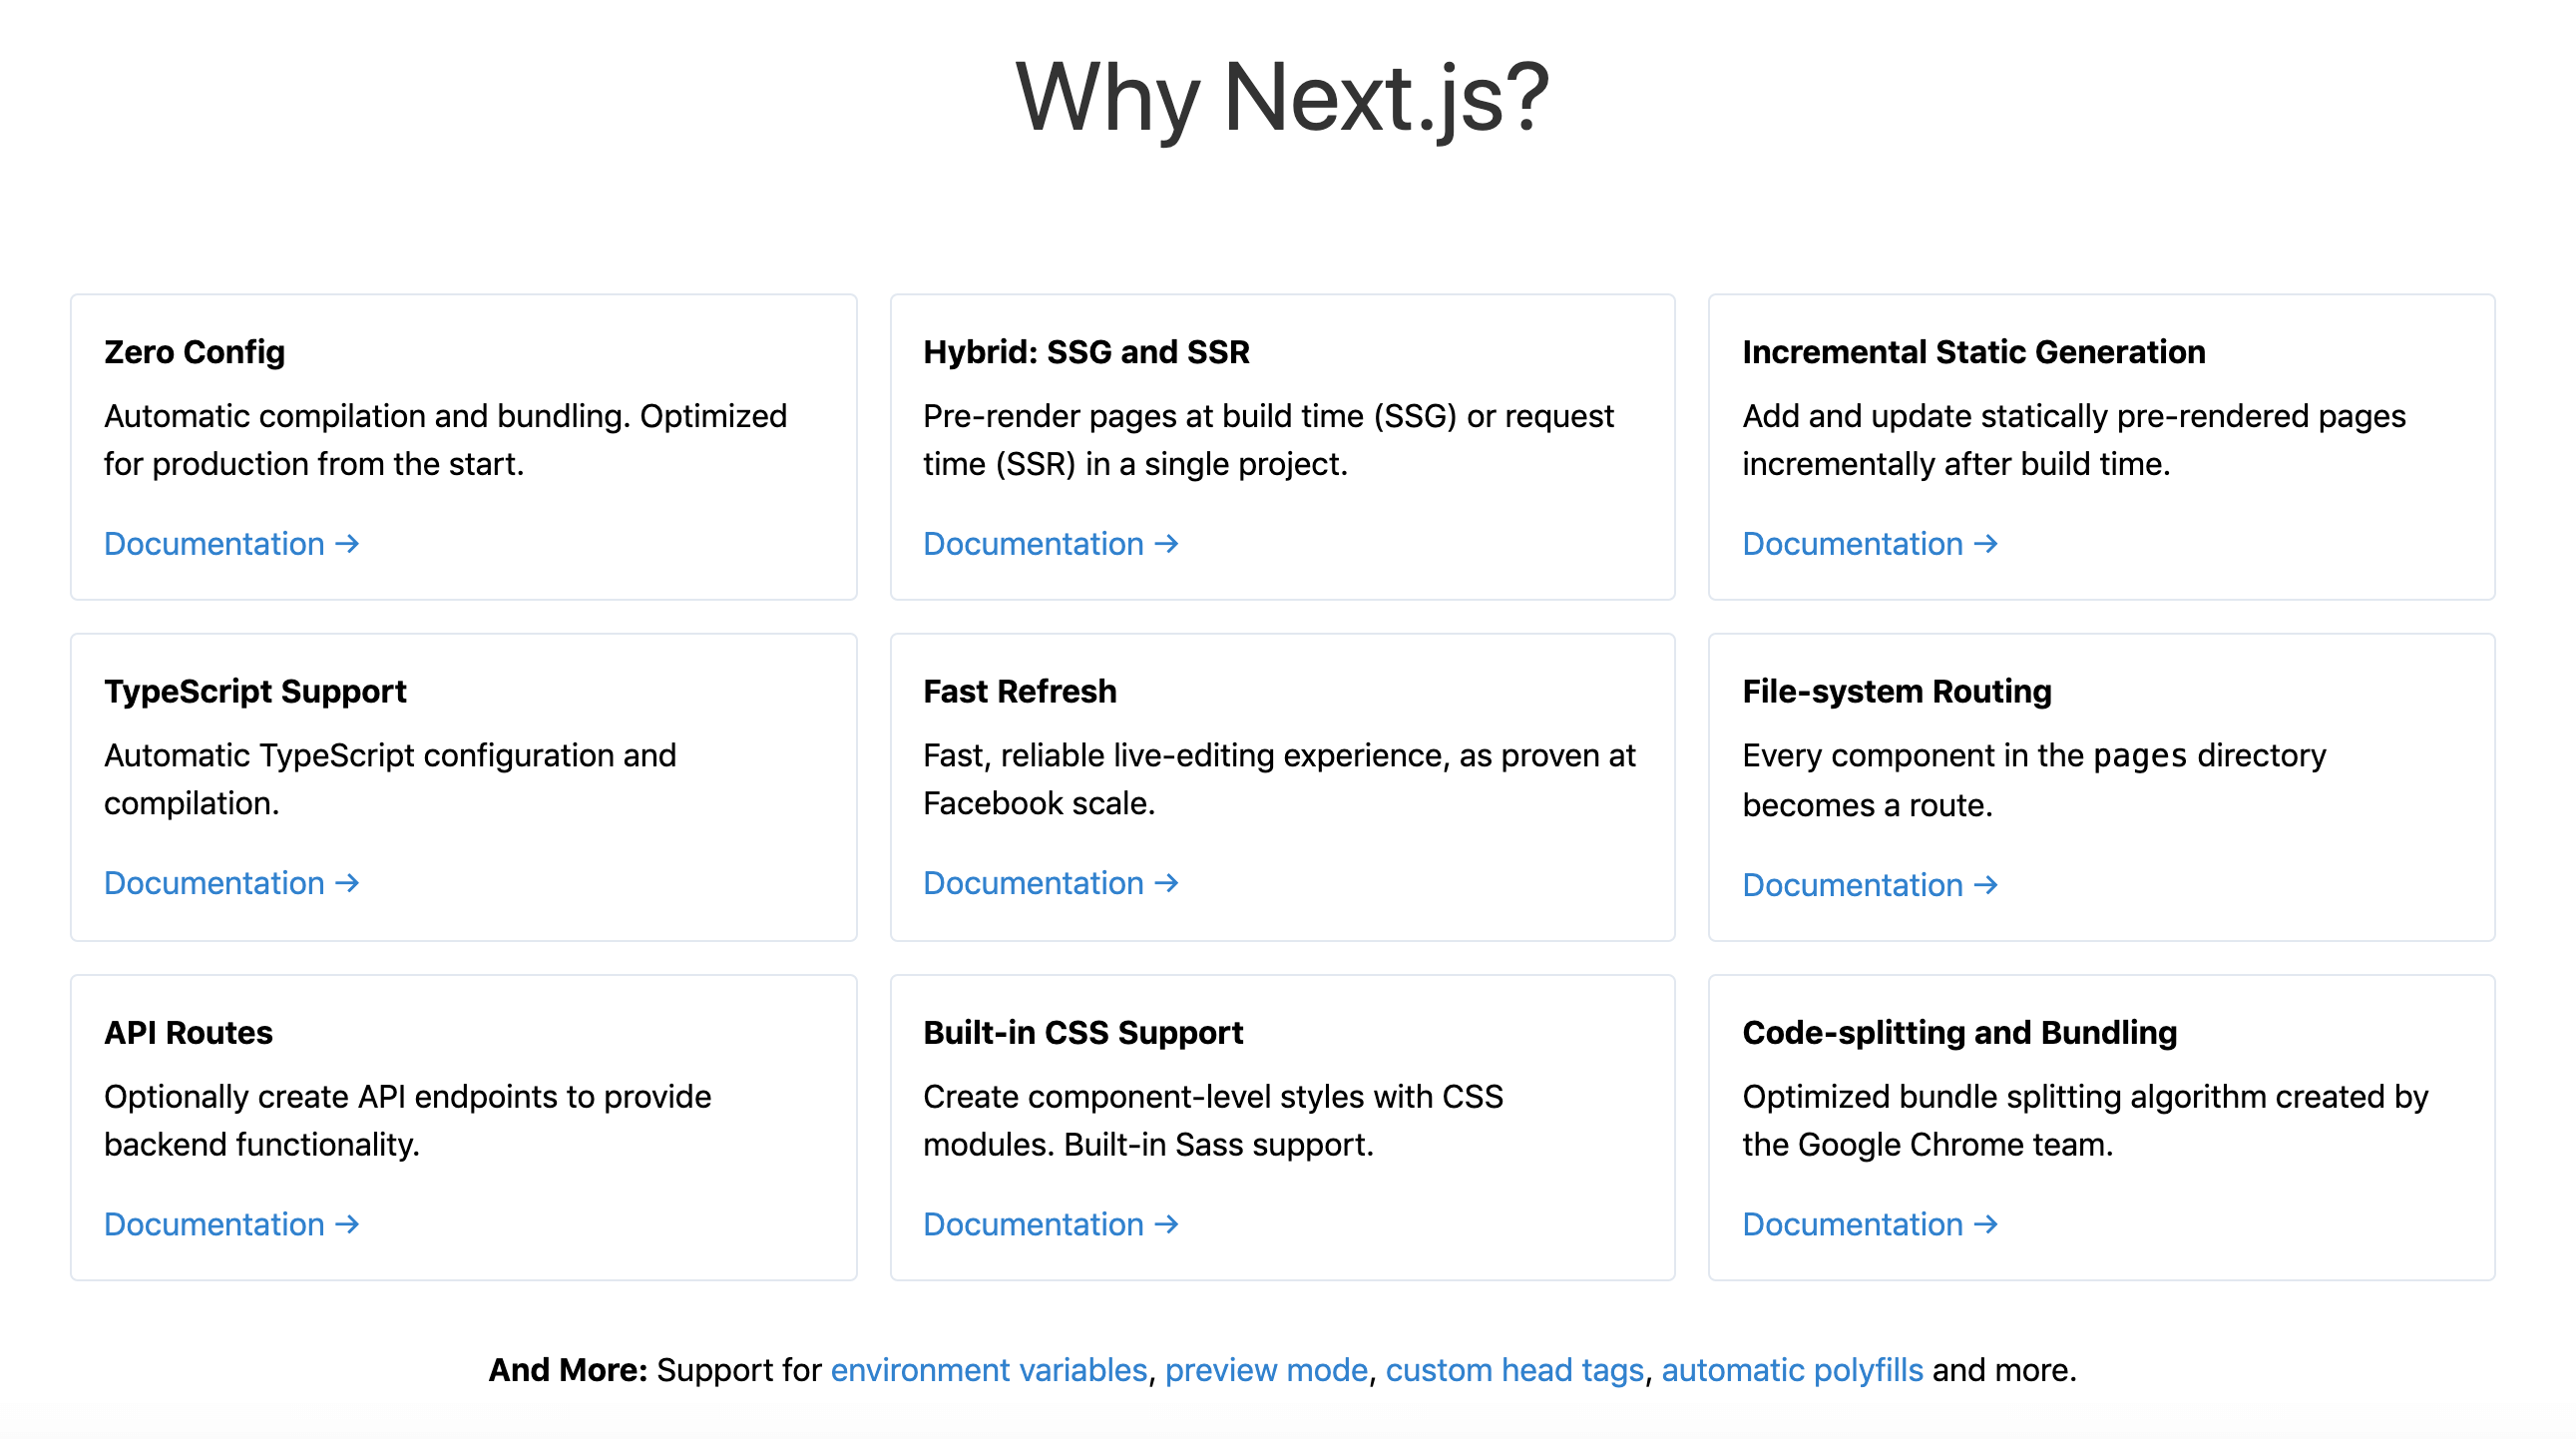
We iterate over the reasons and style them with Tailwind CSS similar to how they are displayed on nextjs.org.
By passing revalidate: 1 we regenerate the page in the background when a request comes in, so that we show the current version of our data.
Conclusion
I think Next.js combined with Google Sheets is a great combo for a minimal, free CMS. But only the recently added Incremental Static Regeneration makes it really shine. Because now we can have a fast static site, which still gets updated whenever data is changed.
Follow along as I'm building yabby.page in public.
Want to talk about this post? Discuss this on Twitter →