- Published on
Next.js YouTube Video Gallery
- Authors

- Name
- Andreas Keller
- @itsakeller
What we are building
Inspired by my projects Awesome React and Awesome Next.js and Colby Fayock's Video Gallery project in 50 Project For React & The Static Web we are going to build a website highlighting the best YouTube Channels of Kitesurfers.
The short guide shows how to work with the YouTube API and teaches you some fundamental Next.js concepts like data fetching and dynamic routing.
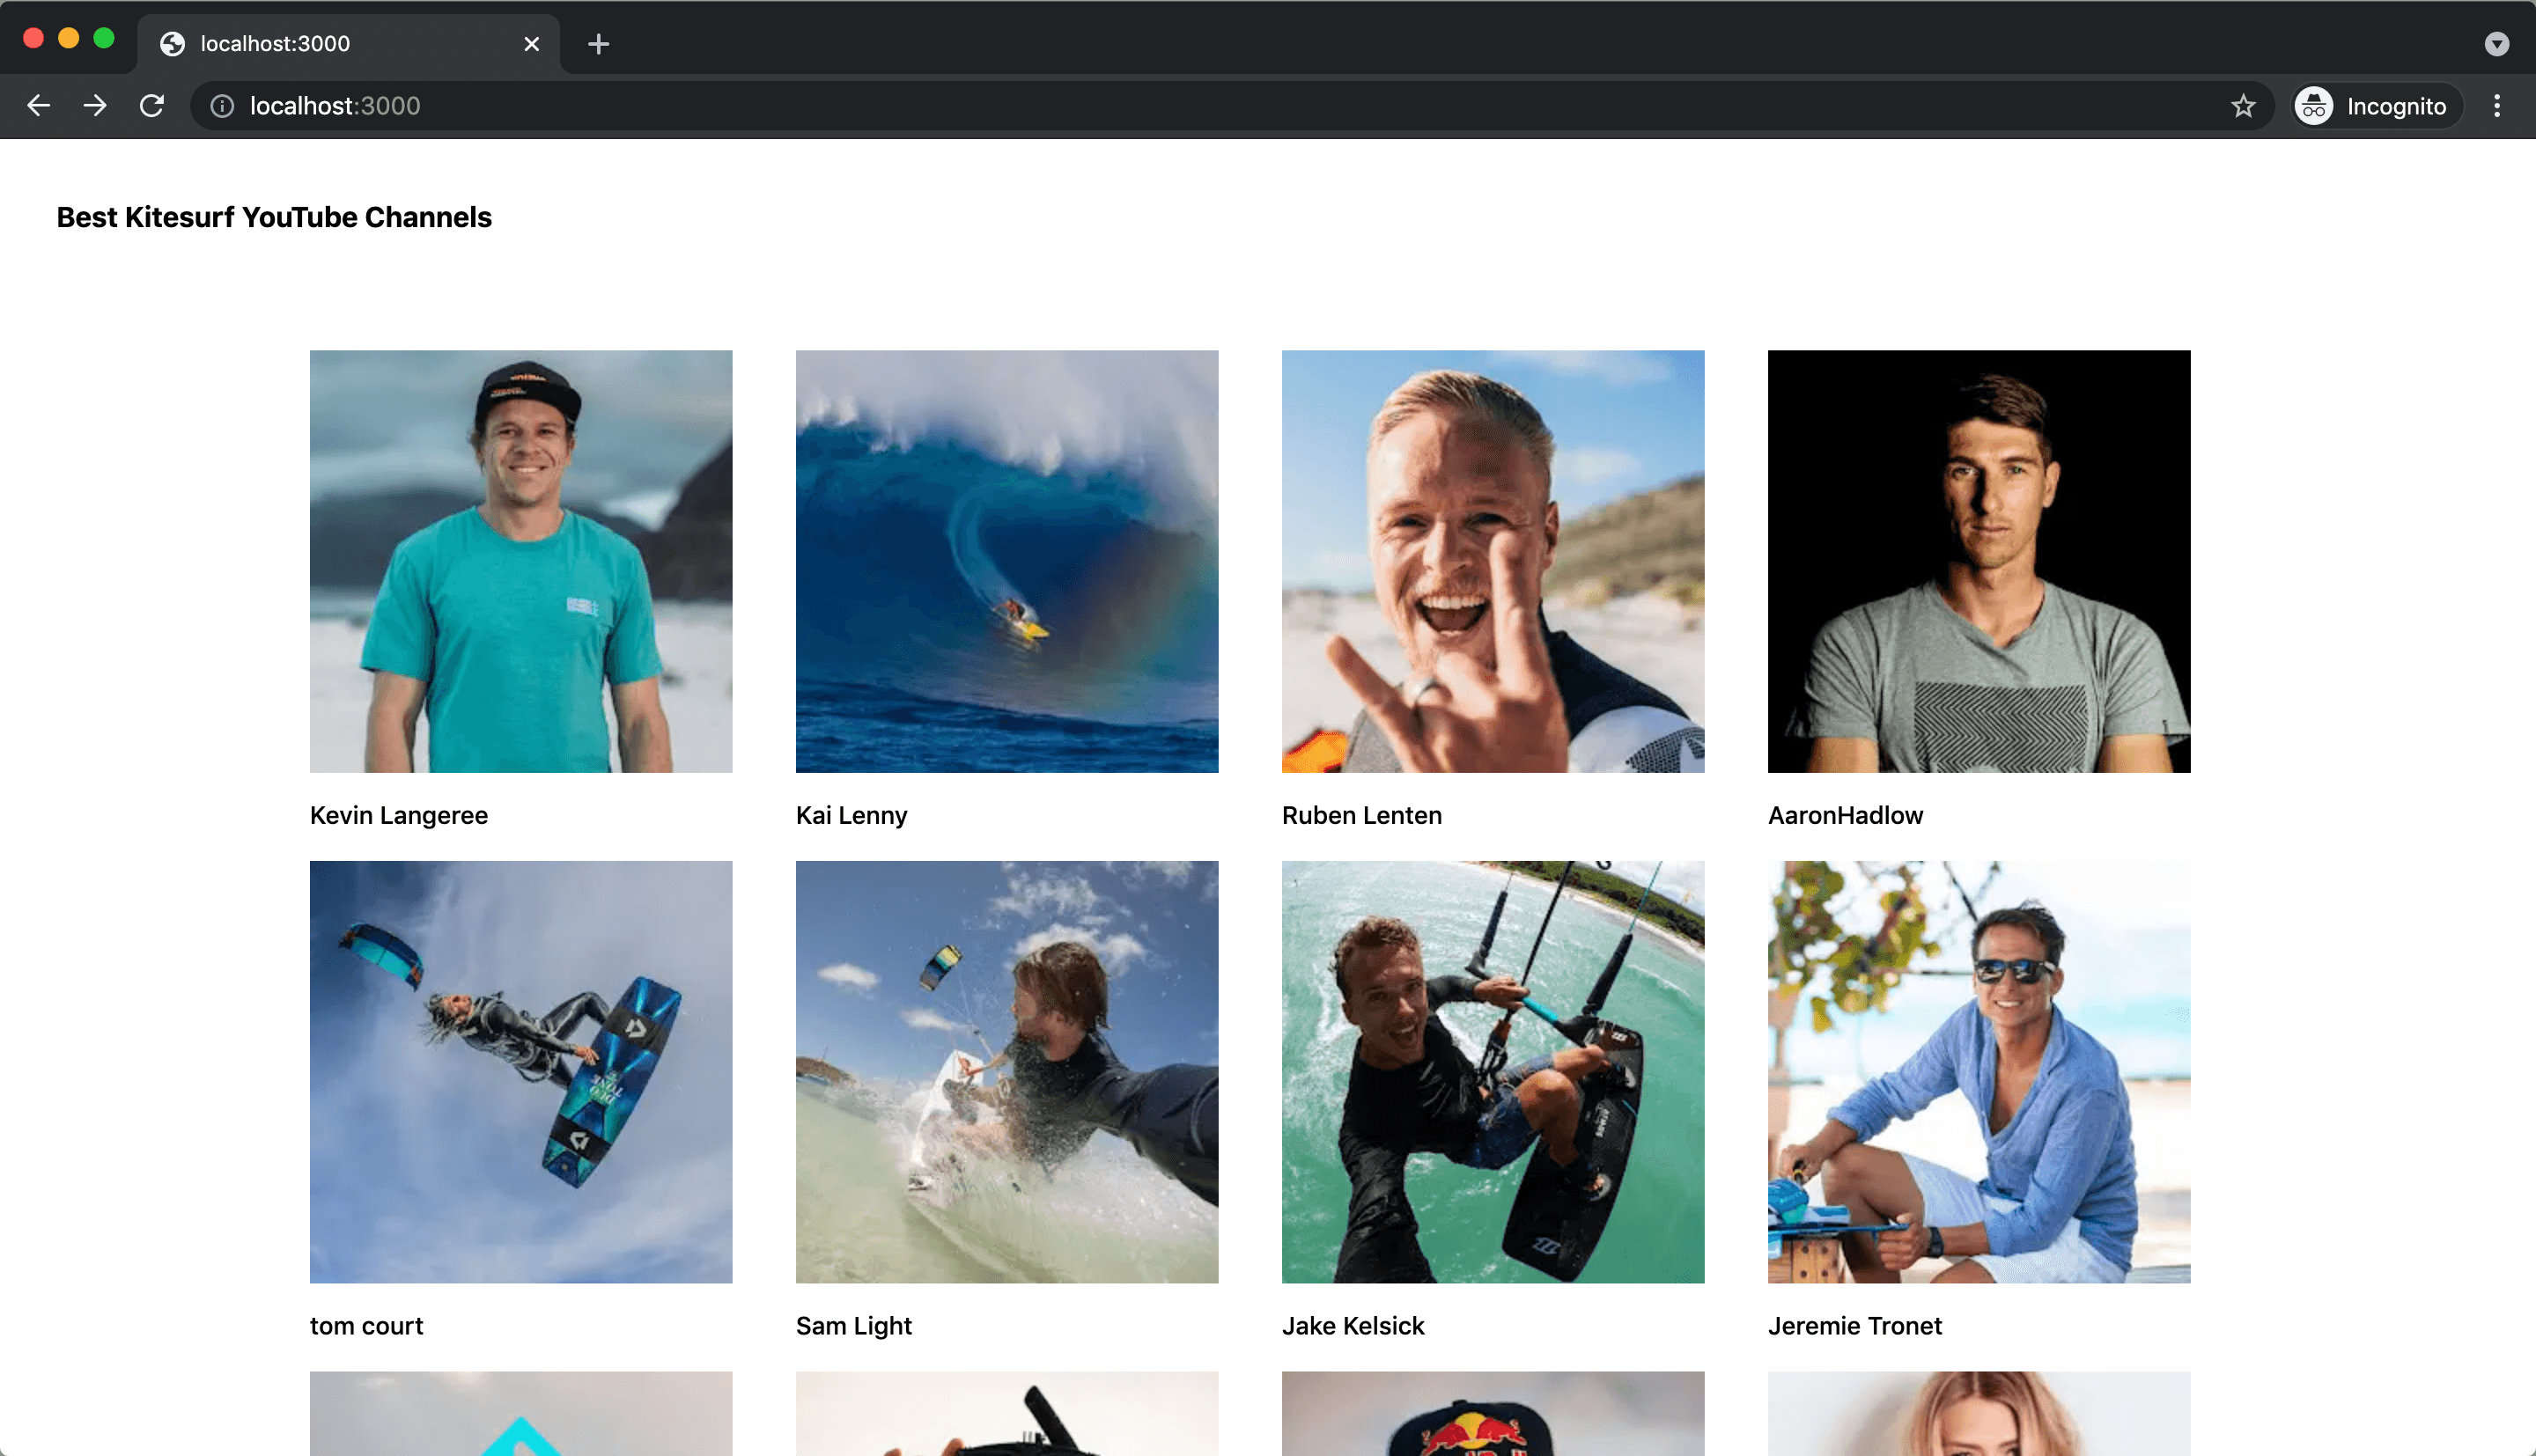
Homepage with a curated list of some of the best Kitesurf YouTube channels.
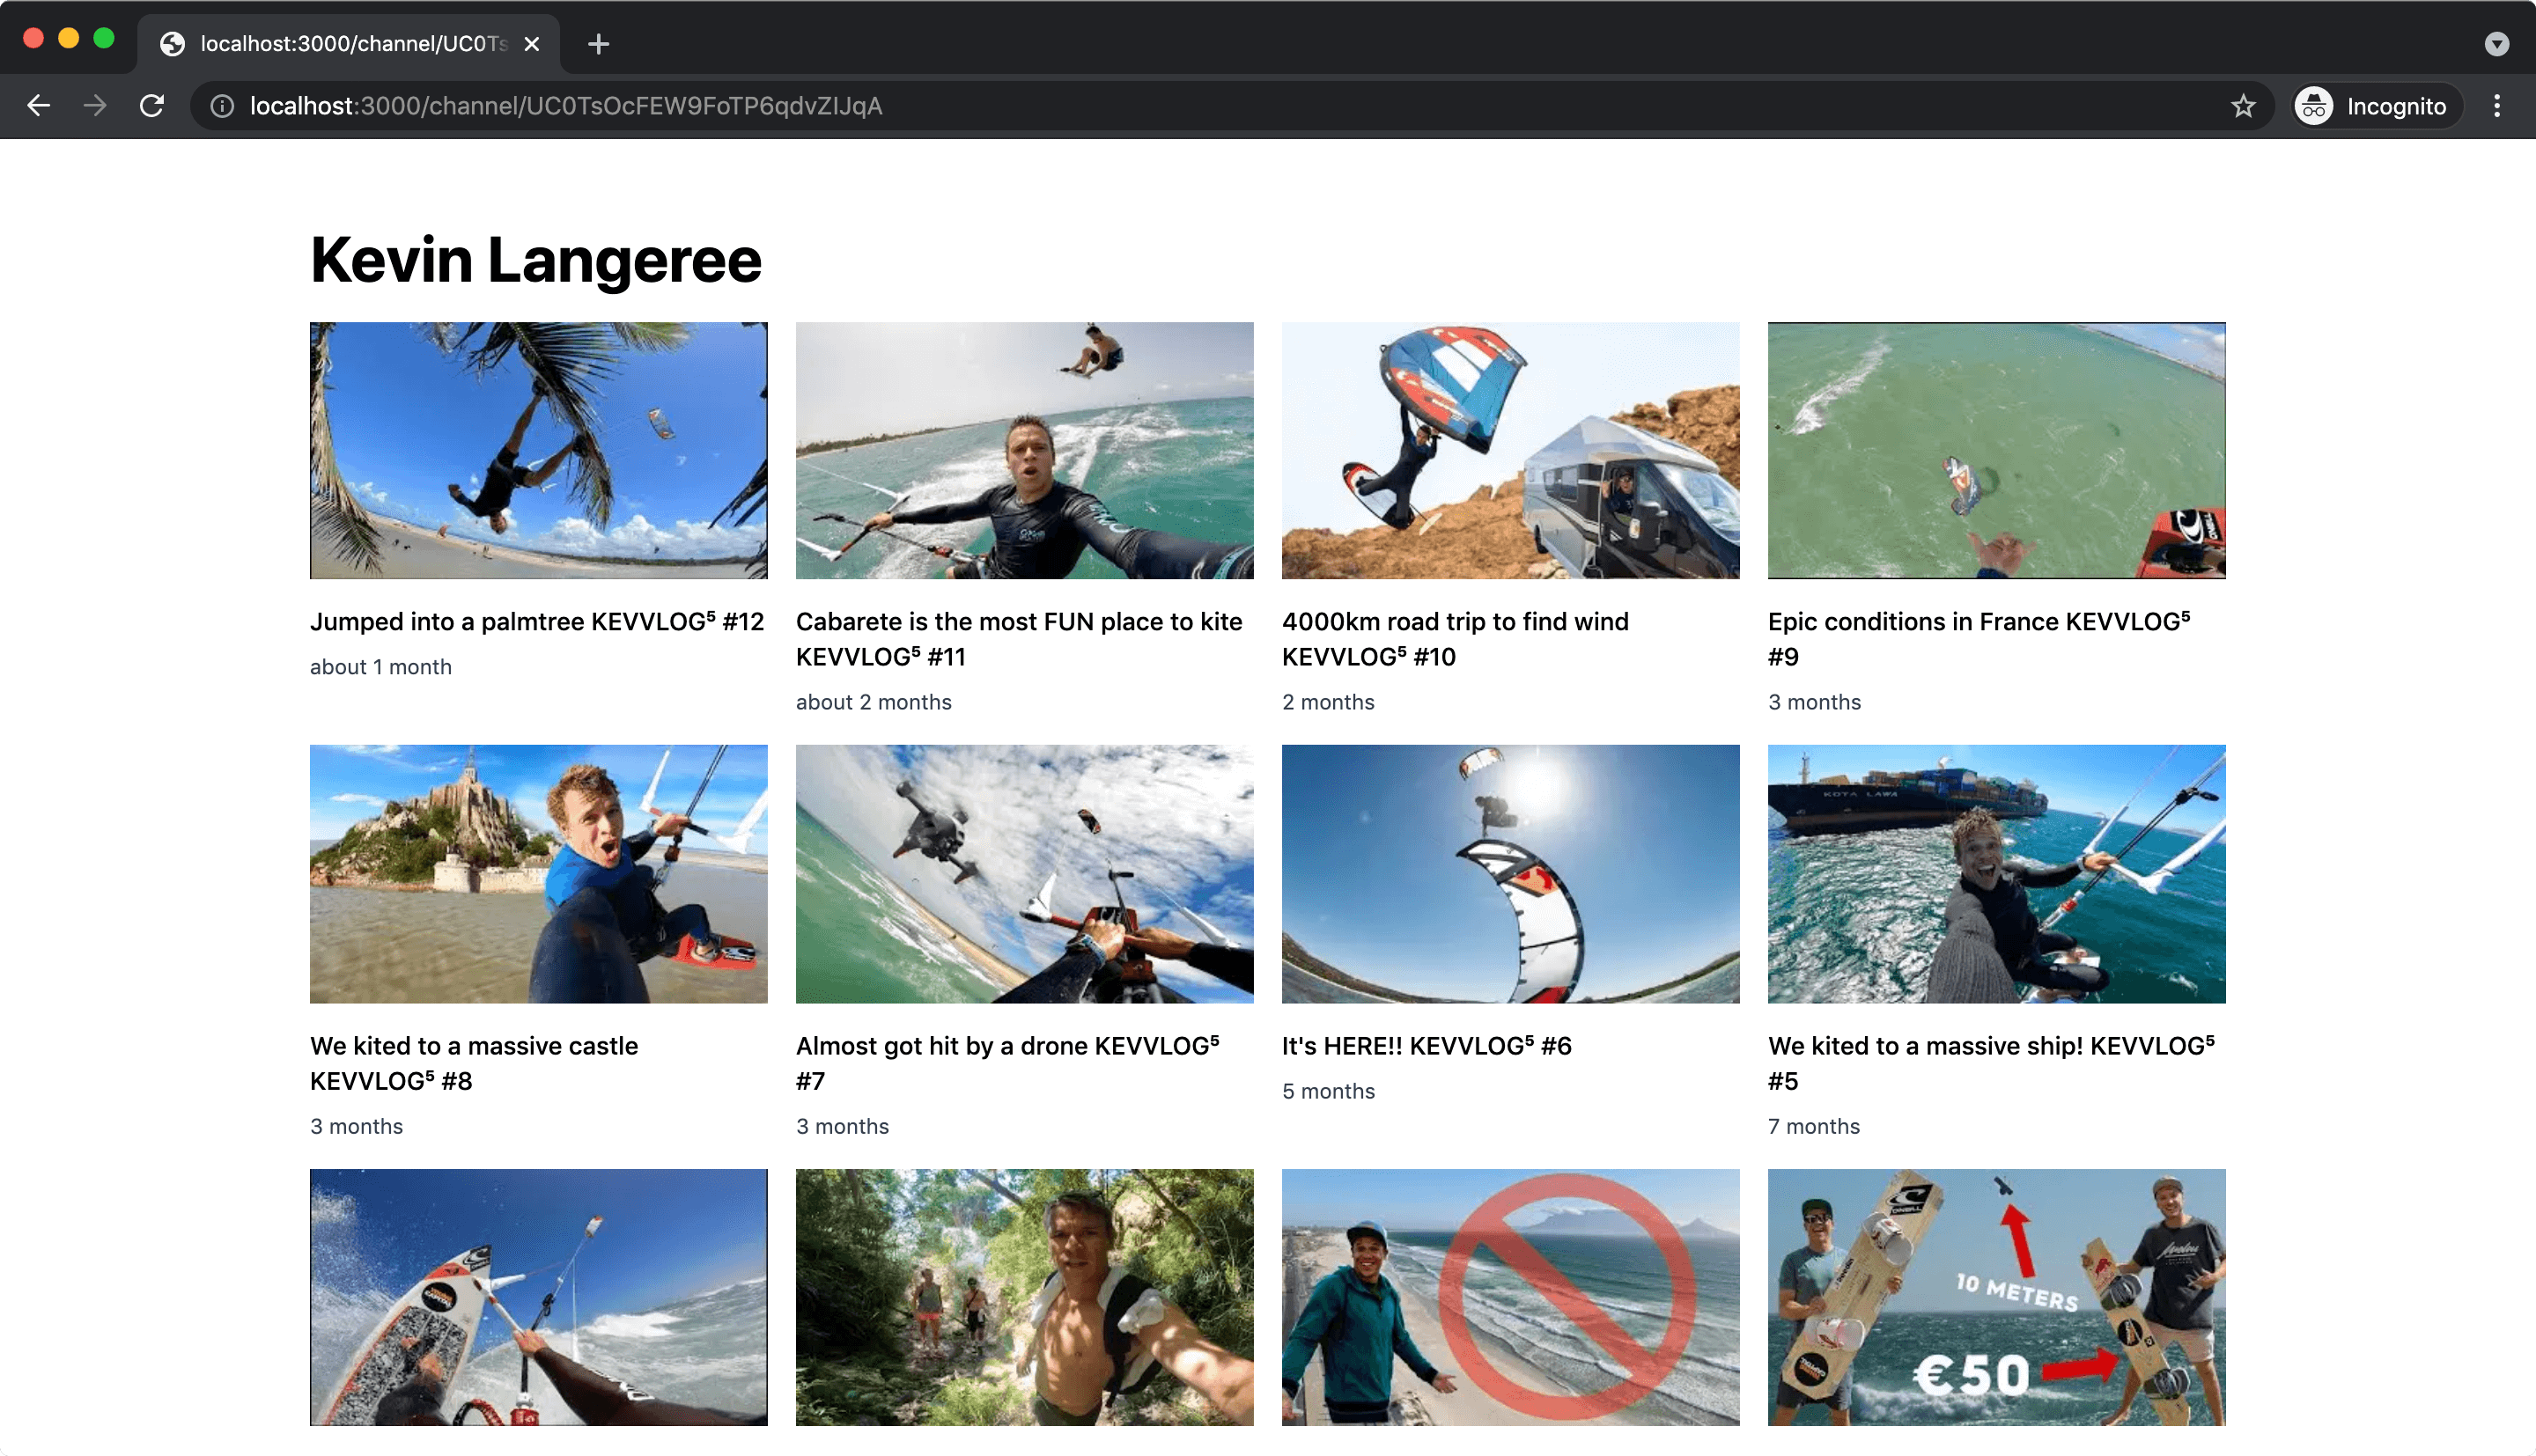
Channel page with list of videos.
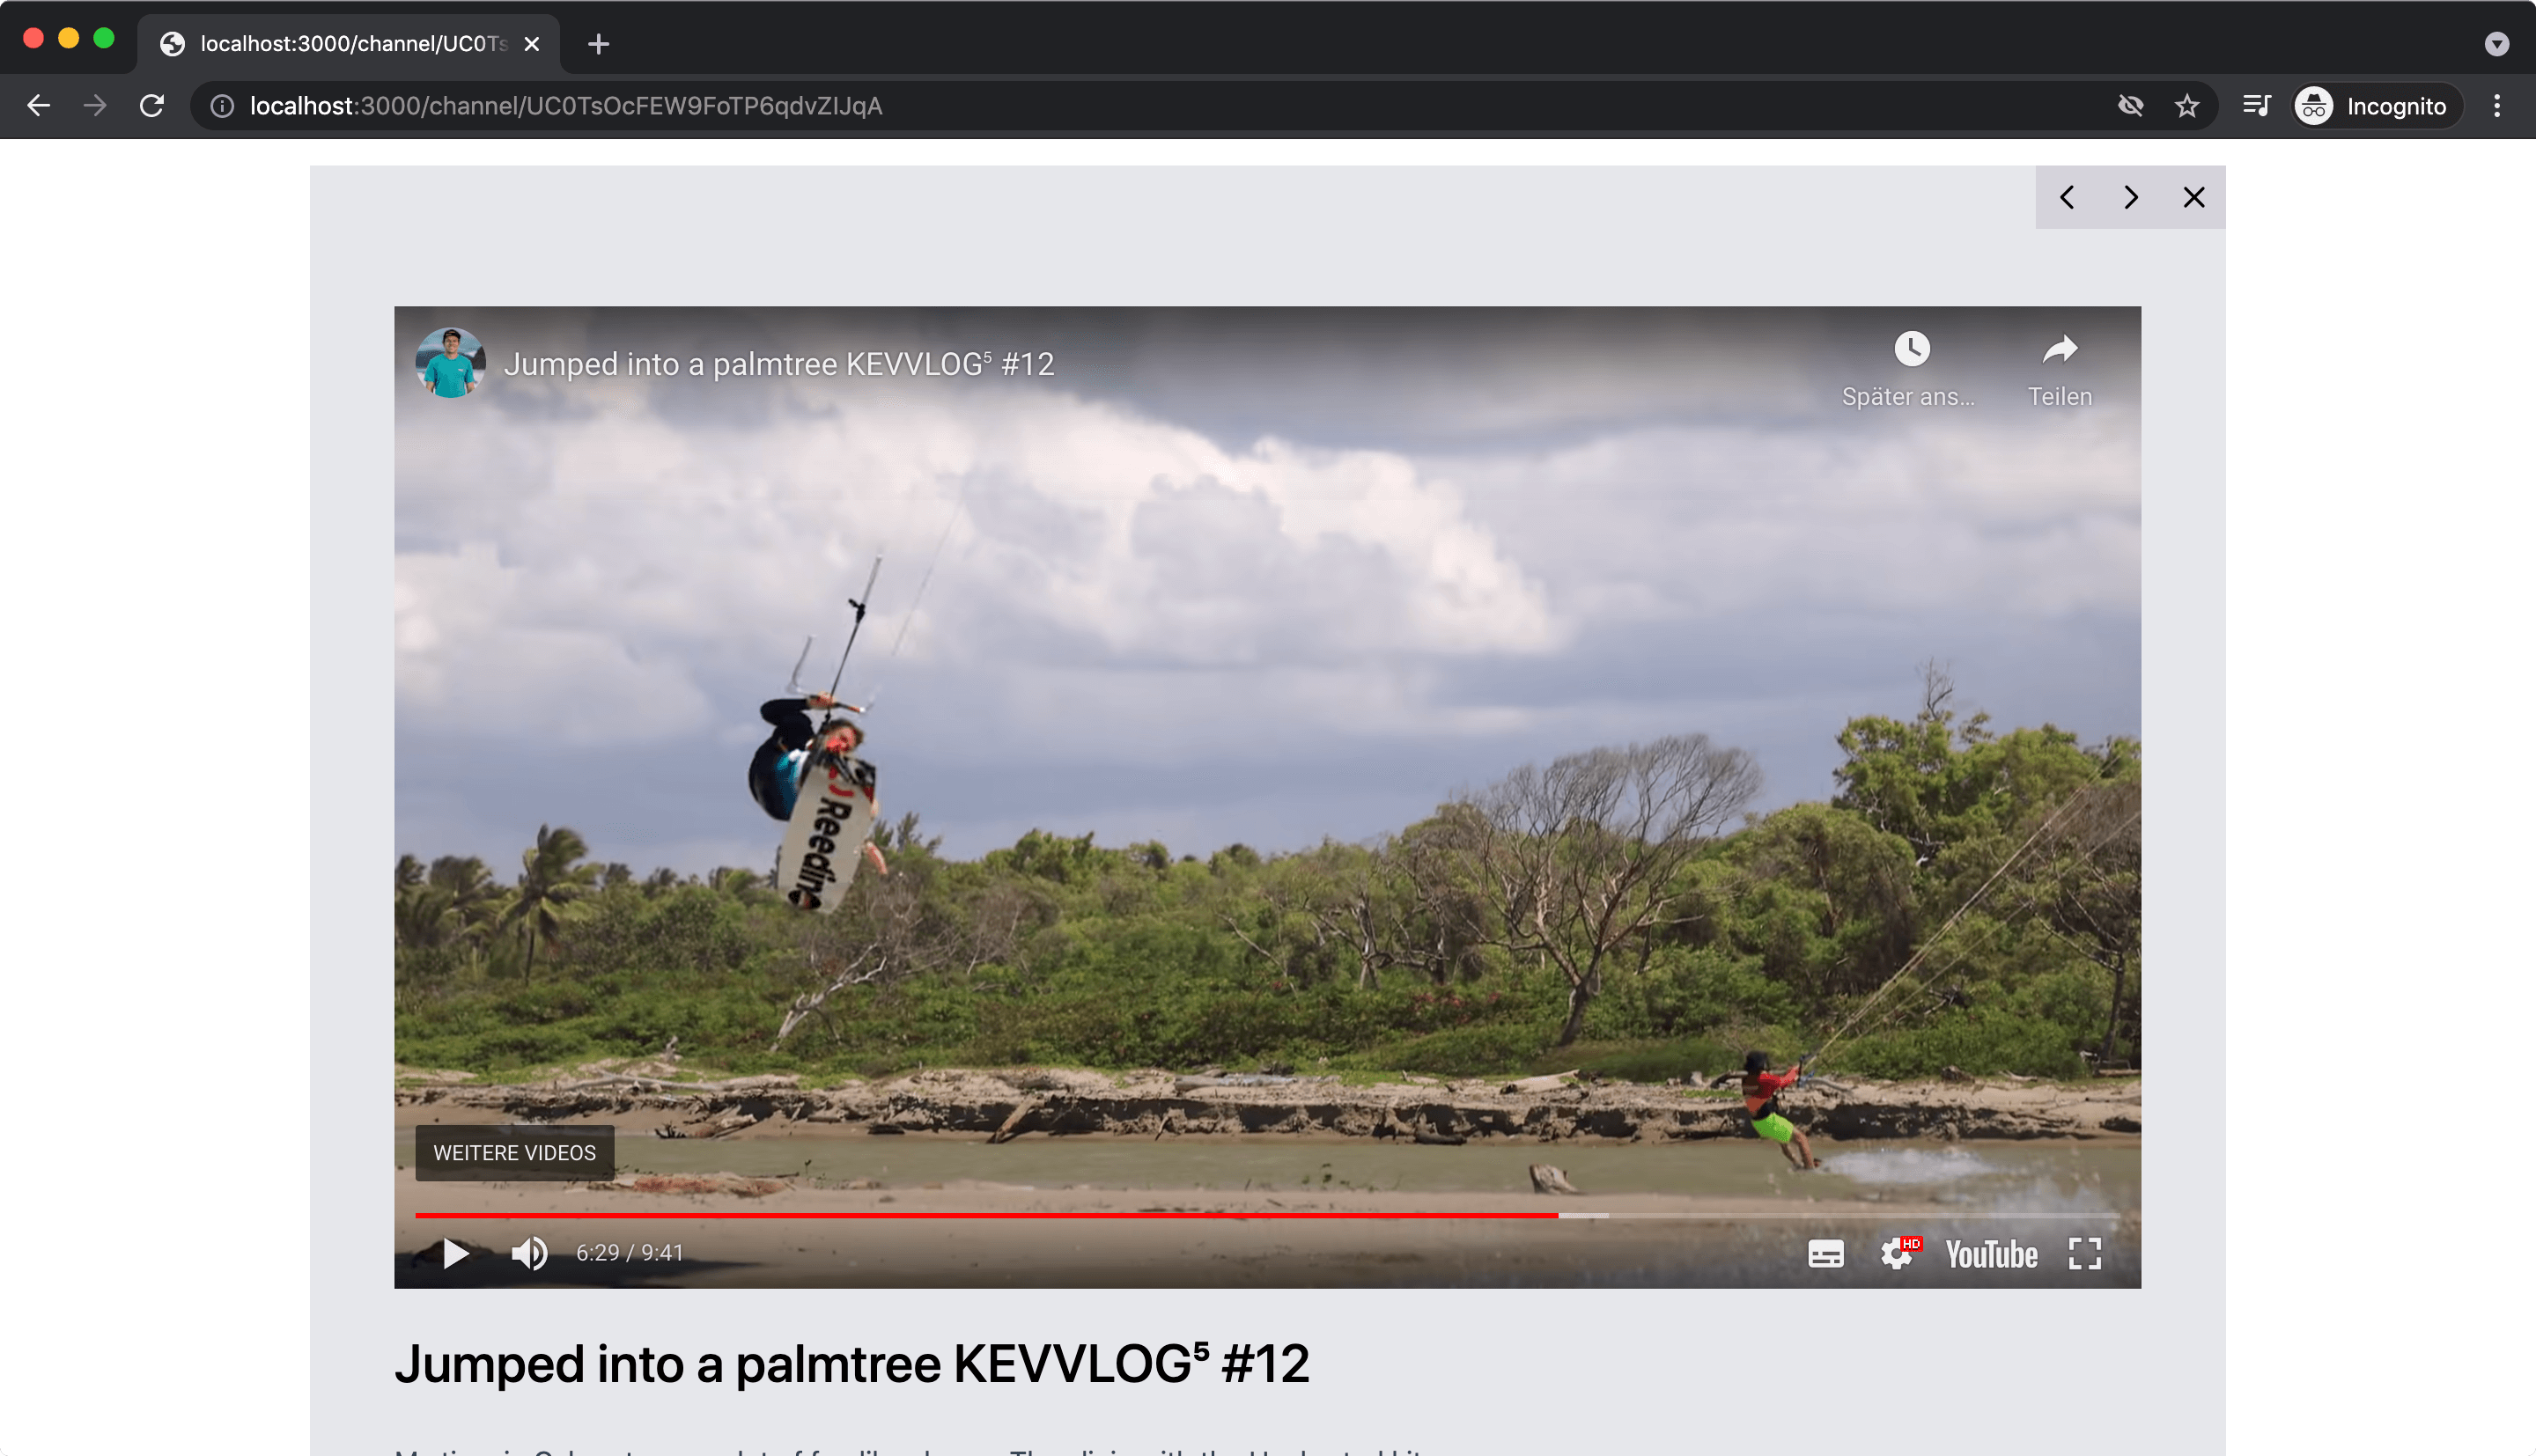
Channel page with selected video playing inside app.
Initalize Next.js App
To get started with a fresh Next.js app already setup with Tailwind CSS (an extremely popular and also my preferred choice to style Next.js apps) we run:
npx create-next-app -e with-tailwindcss video-gallery
# or
yarn create next-app -e with-tailwindcss video-gallery
This installs all the necessary dependencies and prompts you to start with:
cd video-gallery
yarn dev
Now you already have a running Next.js application on http://localhost:3000.
Setting up YouTube API
Create Google account and project
To use the YouTube API we need a Google account. If you don't have one yet, create an account first. Go to https://accounts.google.com and create a free account.
Then go to https://console.developers.google.com/projectcreate to create a new project.
Create API Key
Go to APIs & Services and select Credentials. Click **+ CREATE CREDENTIALS ** and select API key.
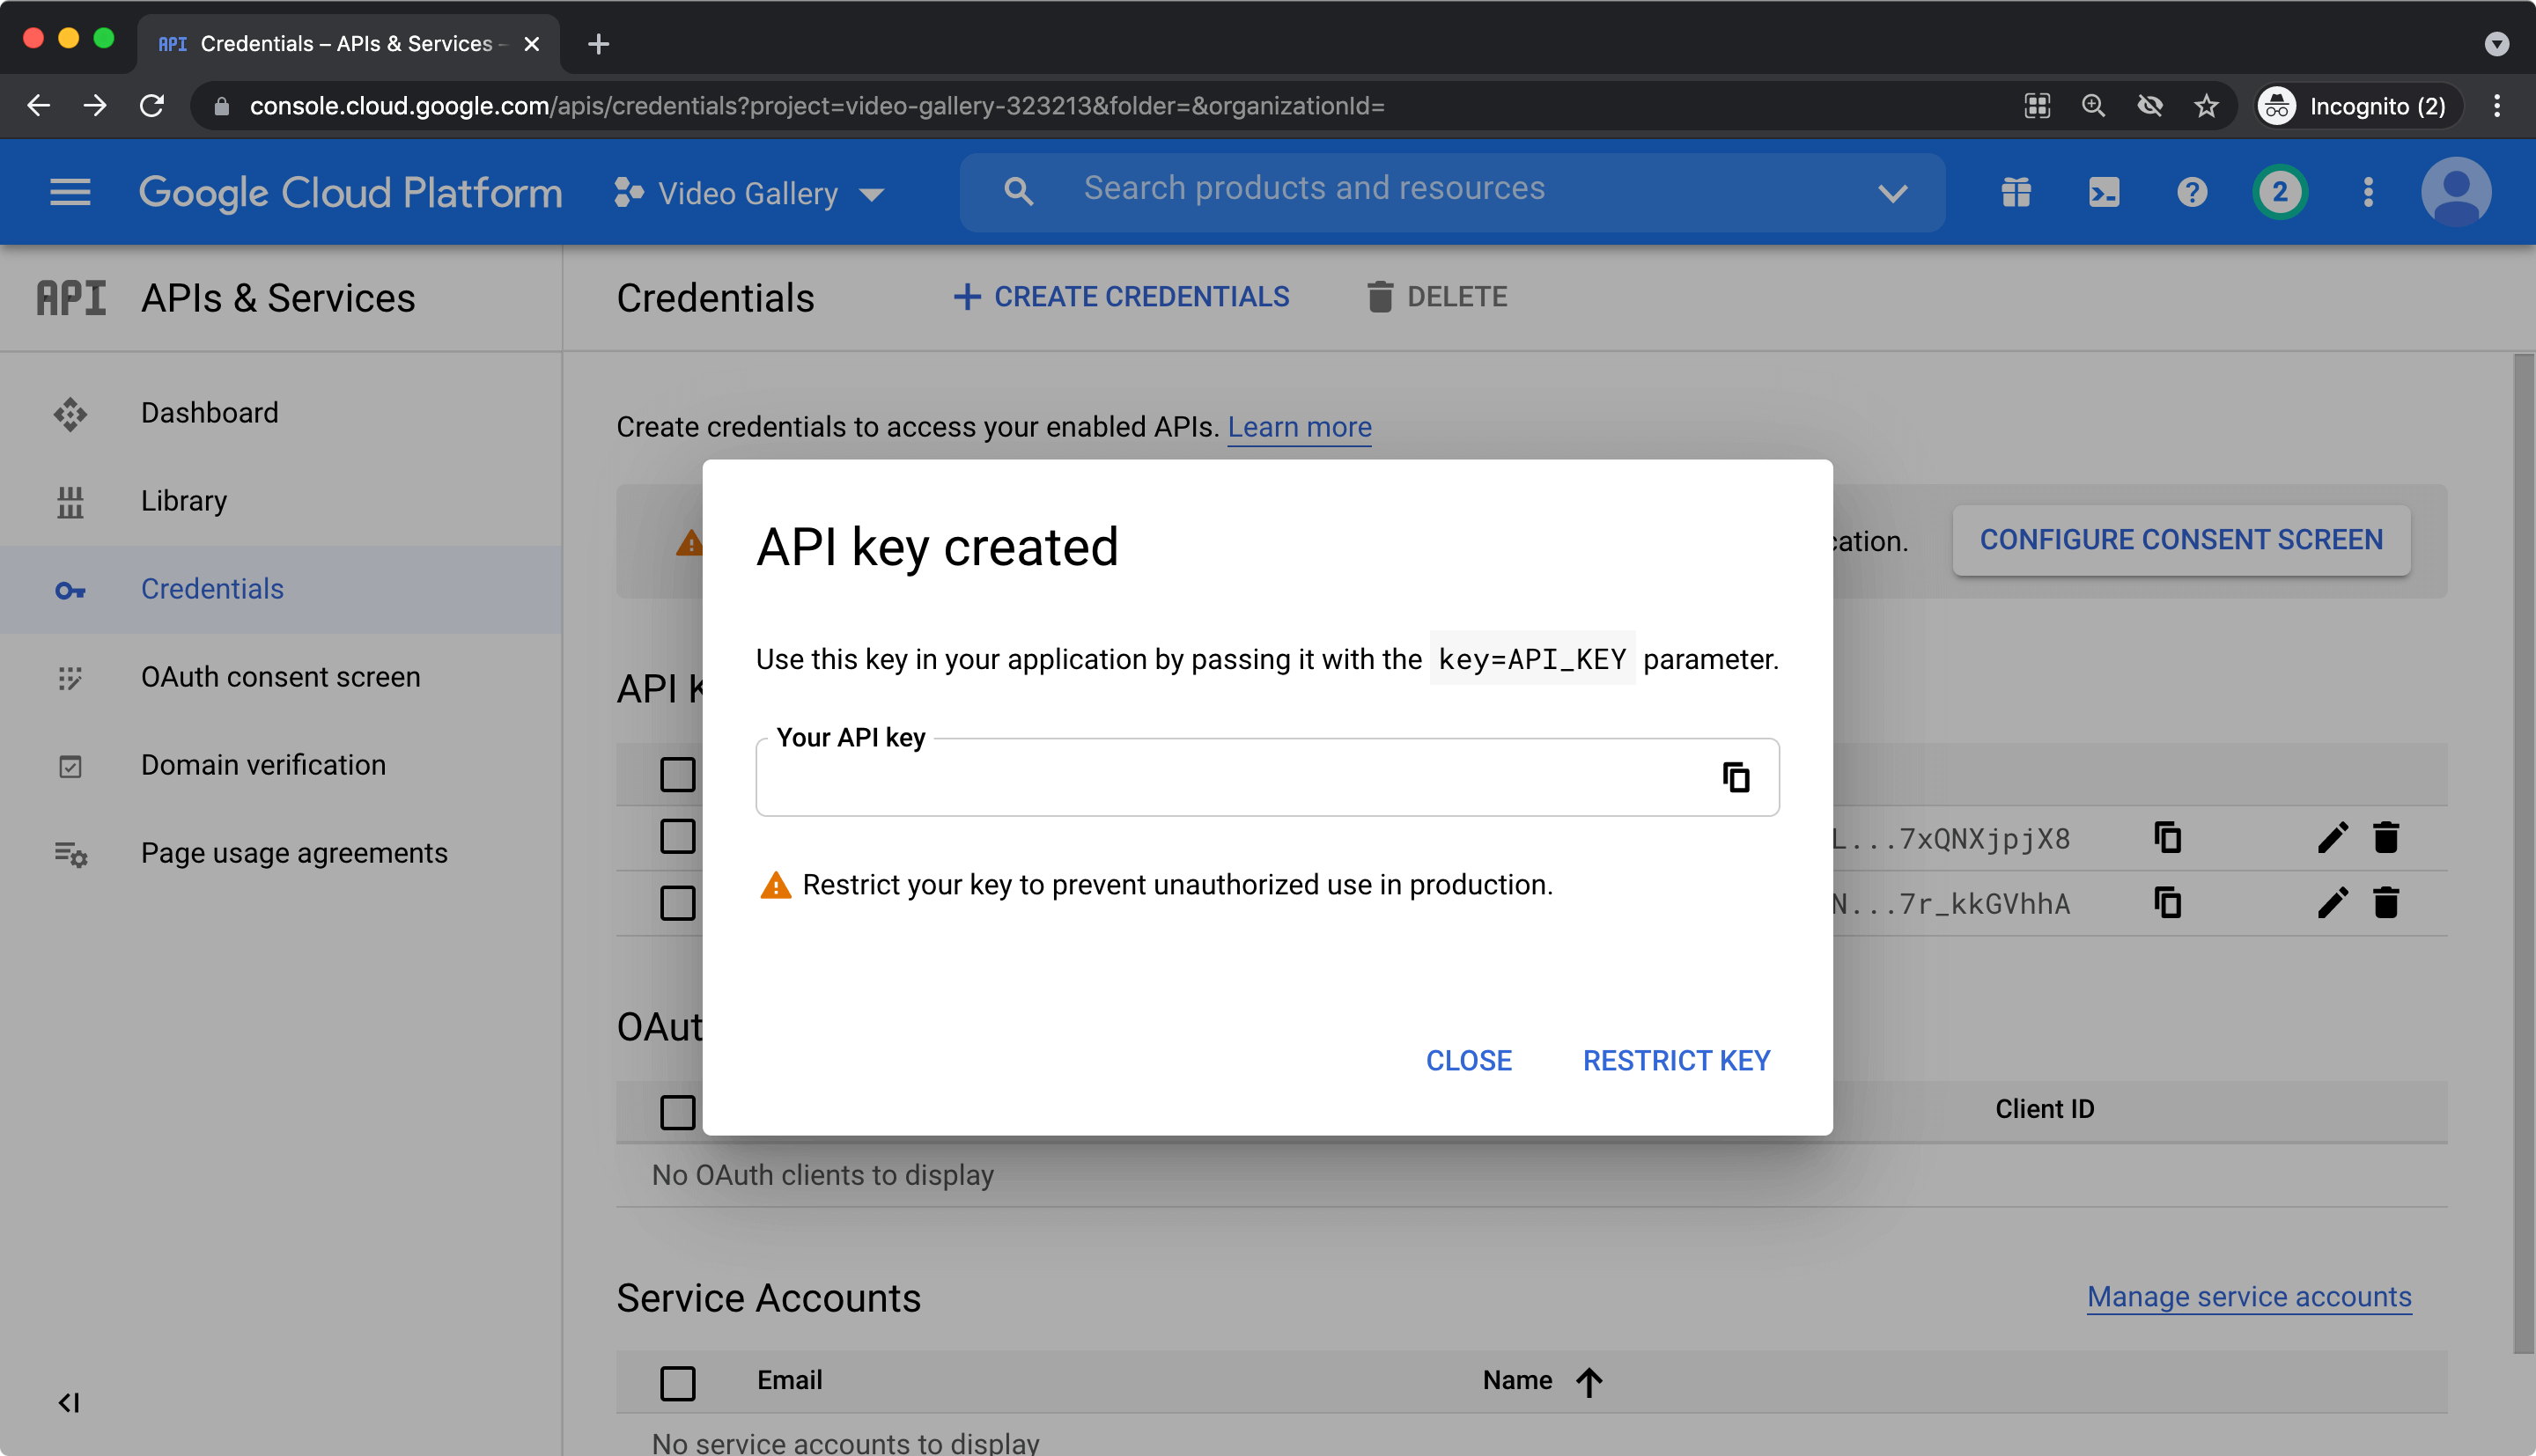
Copy the API key and save it for later.
Enable YouTube API
Next we need to enable the YouTube API for our user. Search for YouTube in the search box or go directly to the YouTube Data API v3 library page. Click the ENABLE button.
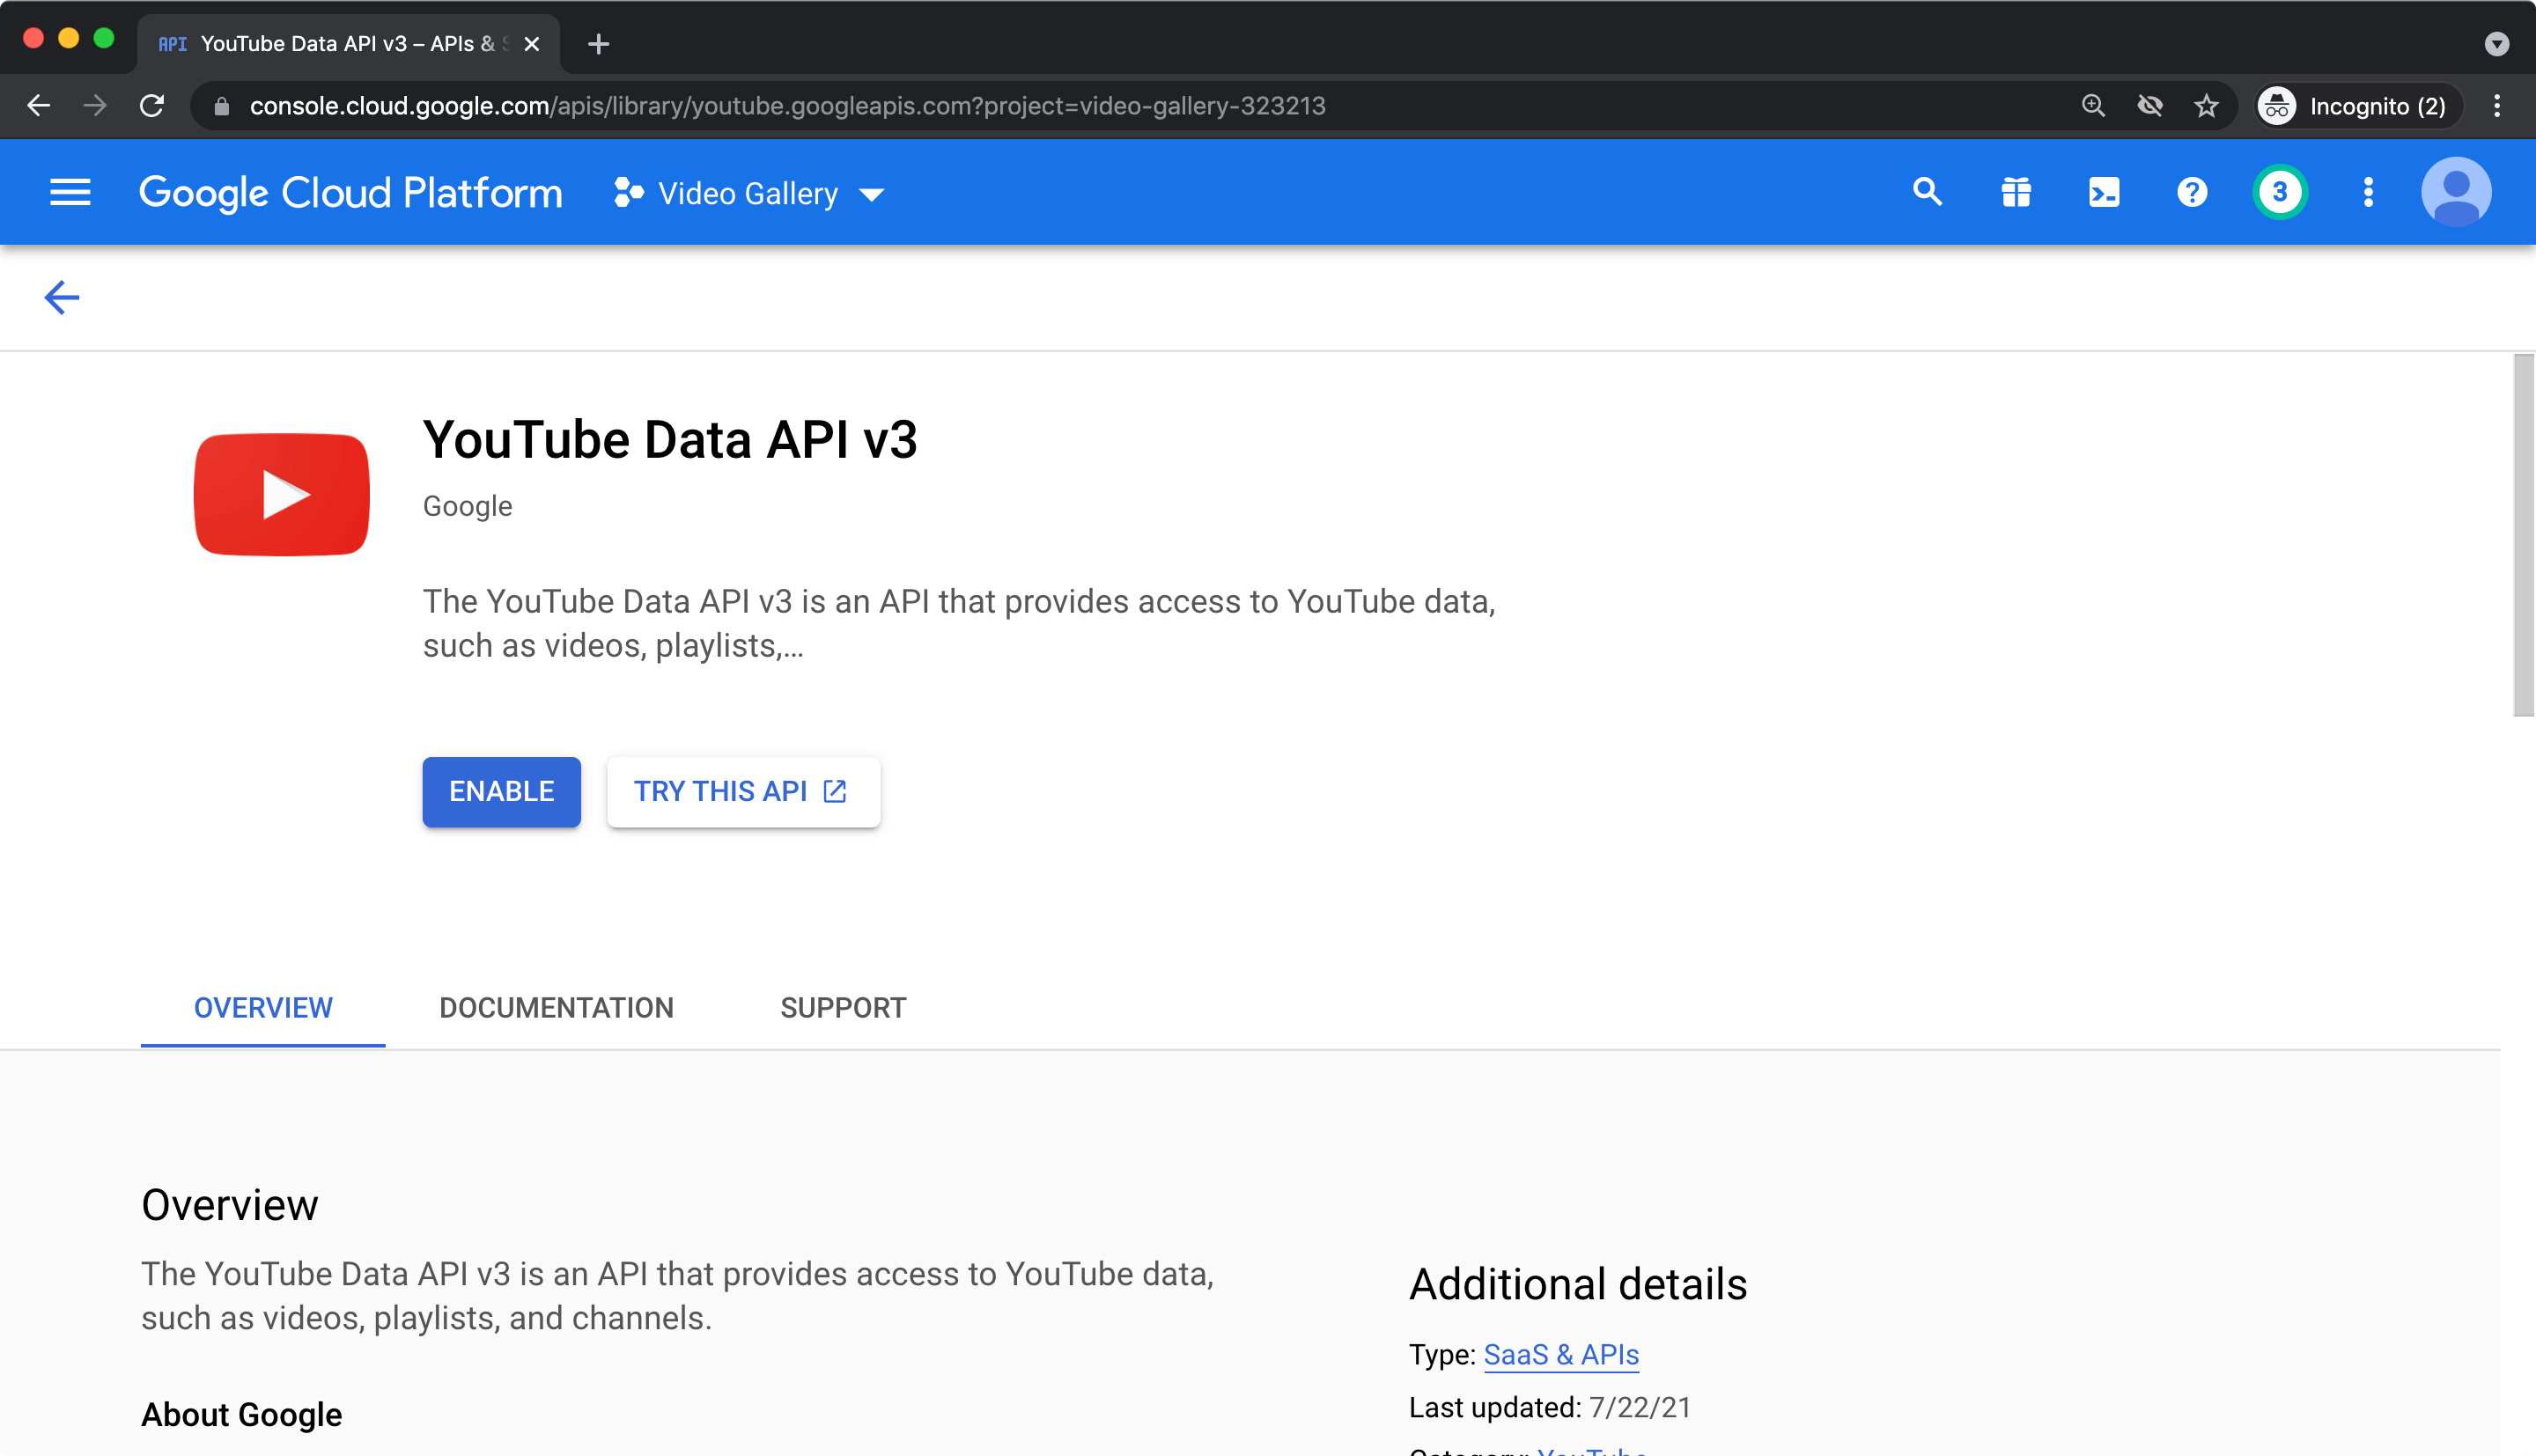
Now we are ready to query the YouTube API.
Exploring YouTube API
First let’s get a feel for the API and which endpoints it provides. Open the YouTube API Reference docs.
We want to display the best channels from kitesurfers. On the homepage we will have a grid of the channels with the channel title and a thumbnail.
So let’s get this information. We need to query the Channels:list endpoint. We can either get the information by providing the id of the channel or the username with the query parameter forUsername.
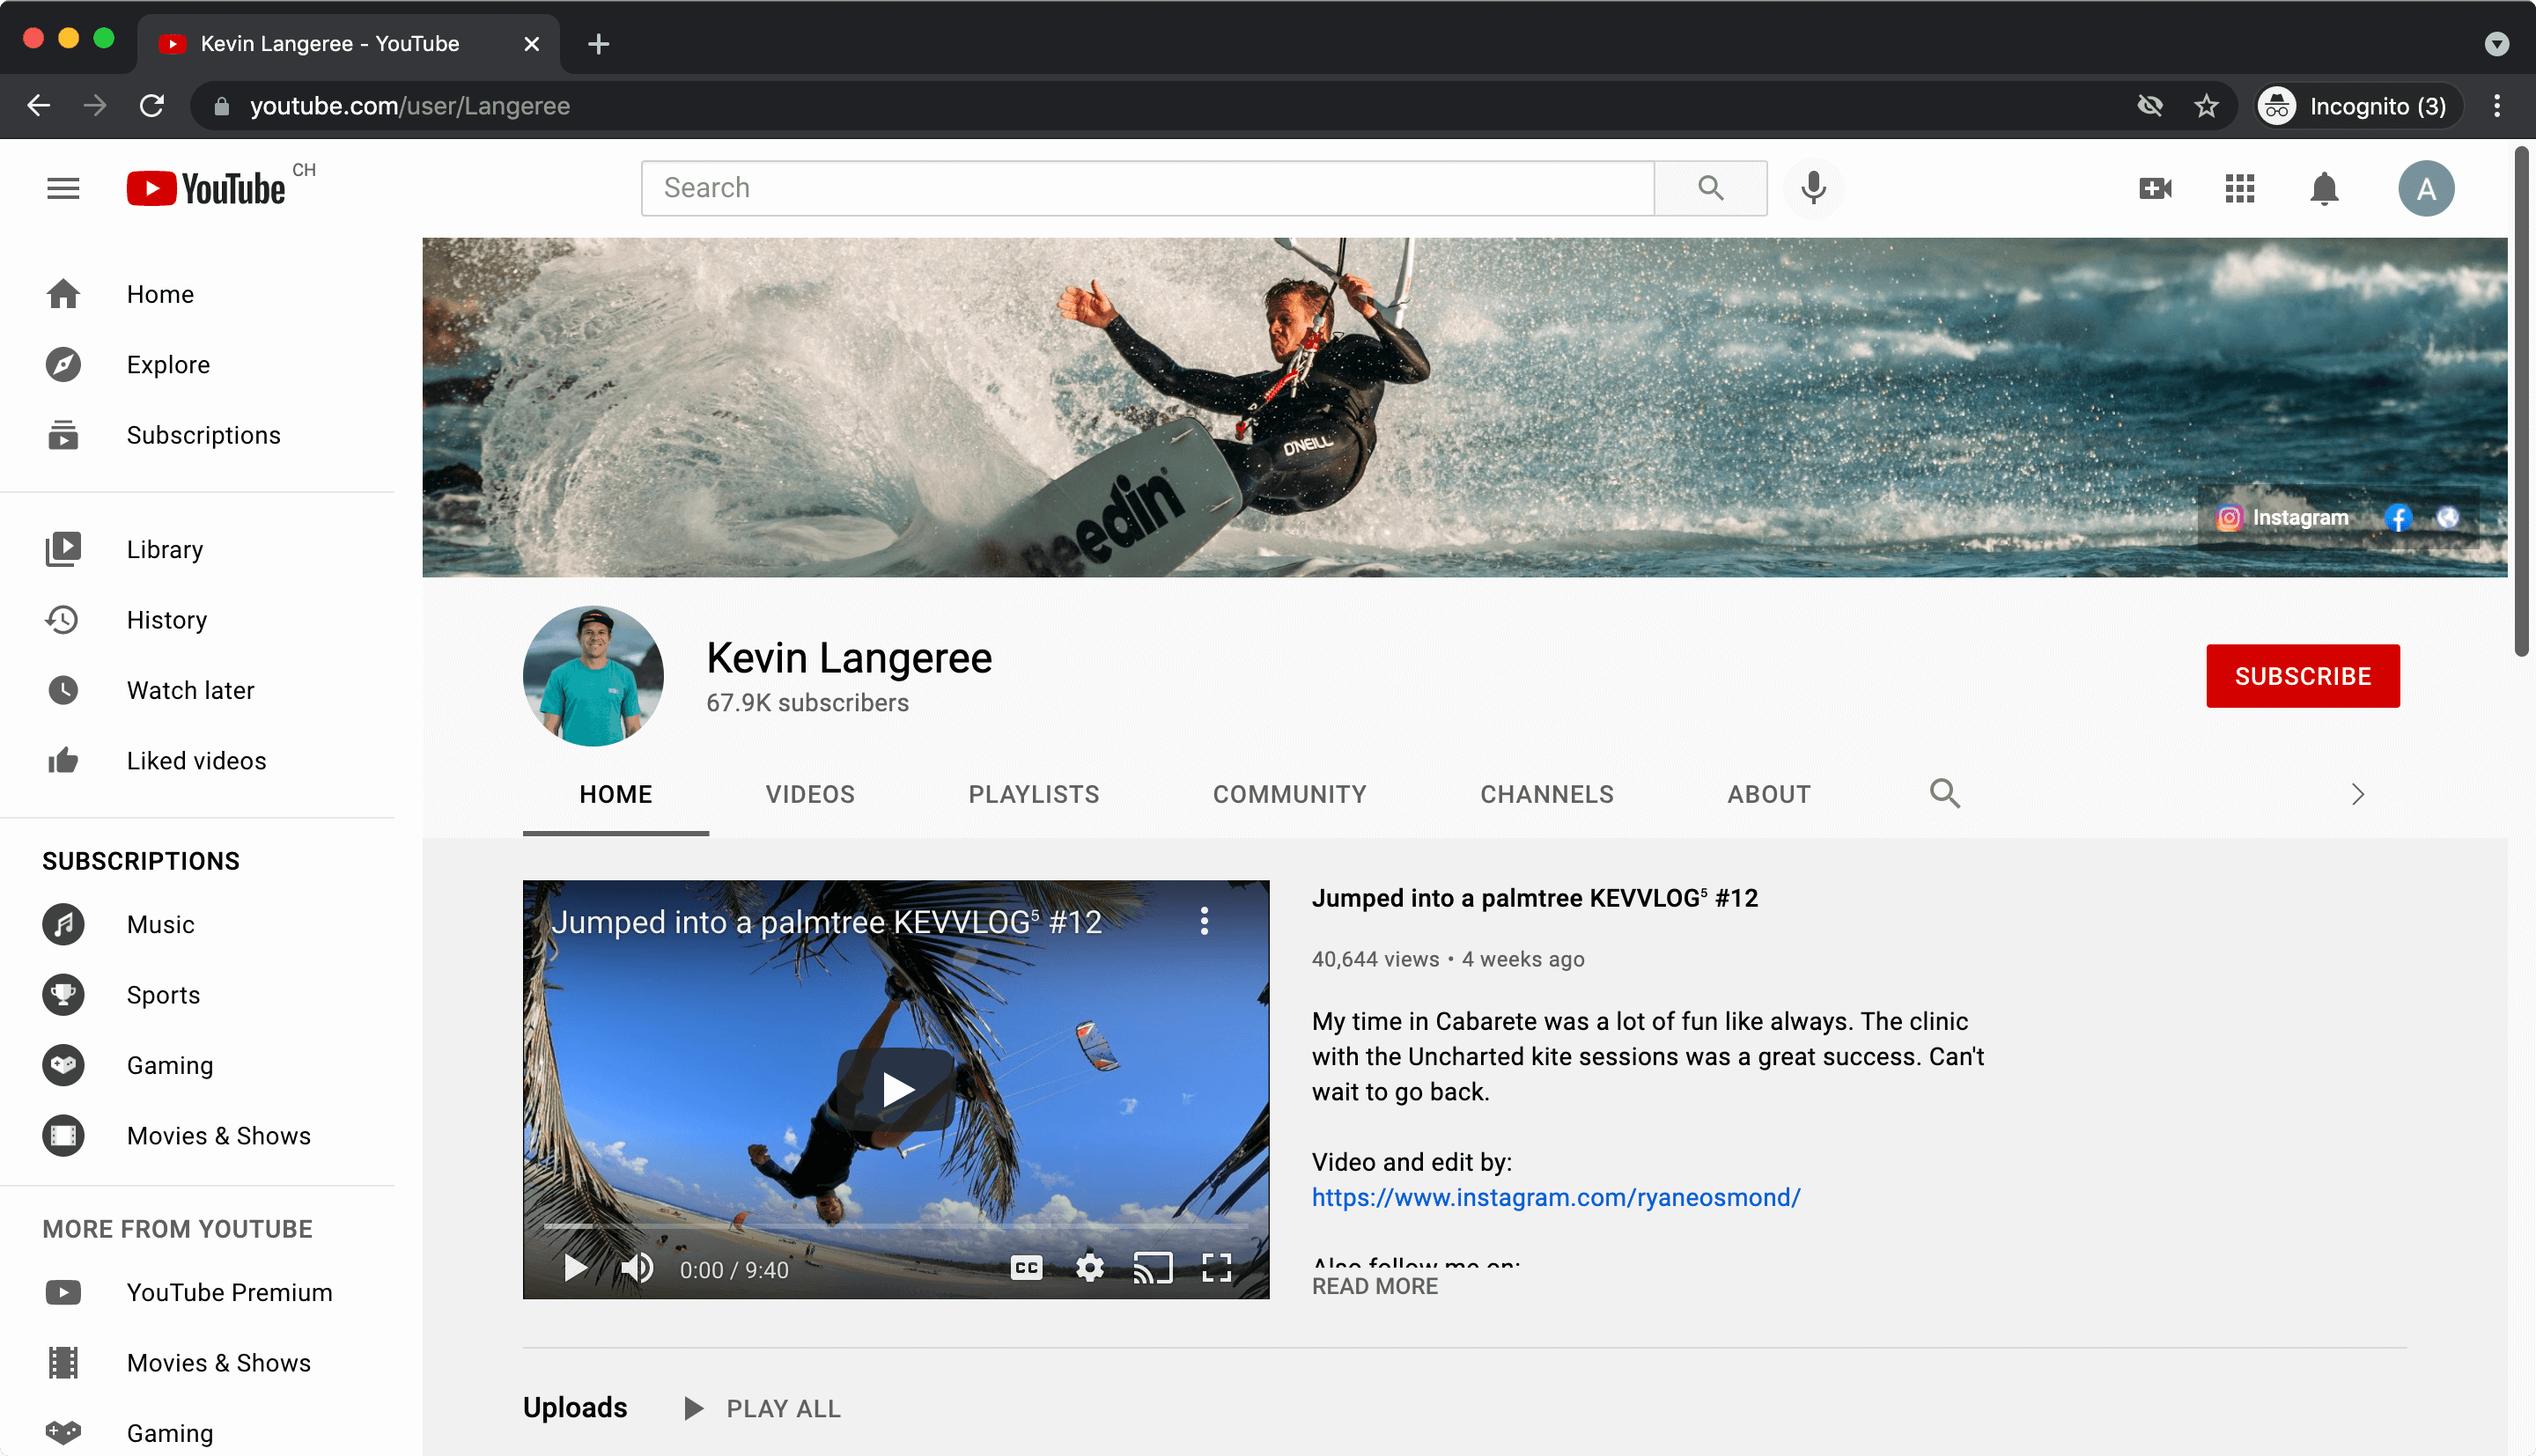
Get the channel ID
If you search for a YouTube user and click on a profile you will get a channel URL with the username (e.g. https://www.youtube.com/user/Langeree).
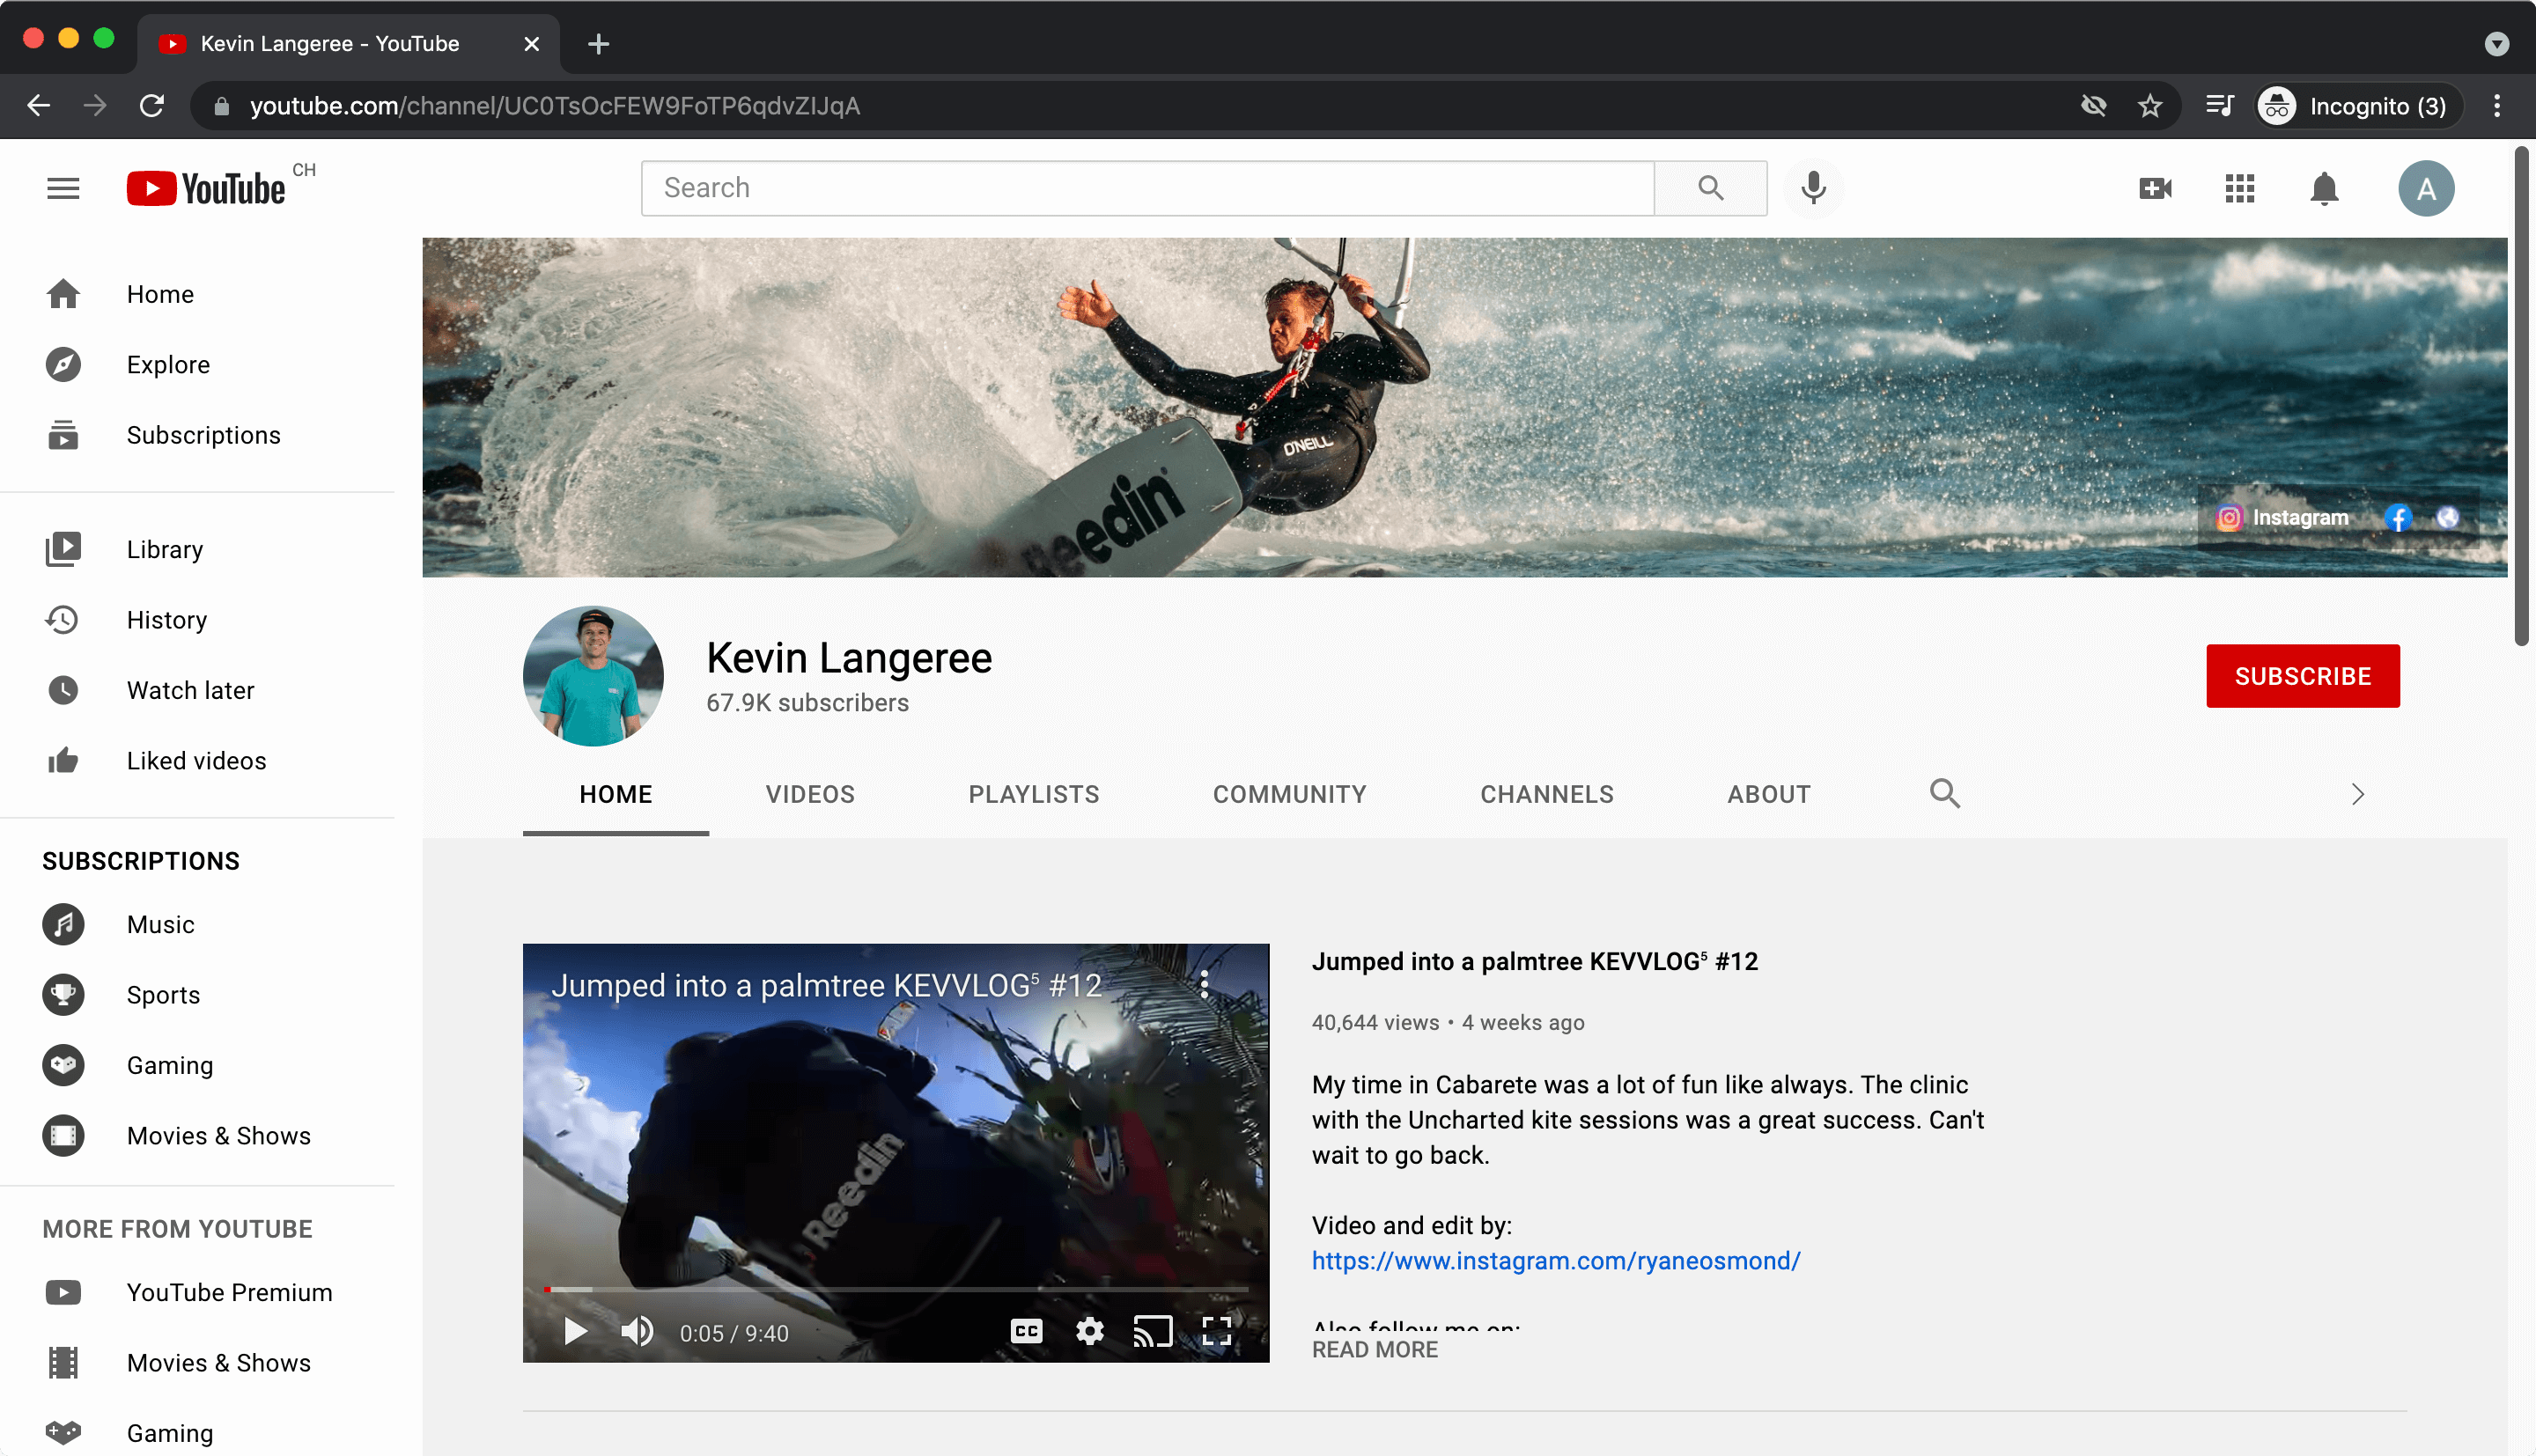
To get the channel ID you first have to select a video and then click the profile image above the video description. Now you have the channel URL with the channel ID (e.g. https://www.youtube.com/channel/UC0TsOcFEW9FoTP6qdvZIJqA).
Query the API with the API Explorer
YouTube provides a handy API Explorer next to the API docs to quickly test out the API. Let’s enter our example channel ID UC0TsOcFEW9FoTP6qdvZIJqA in the id field and snippet in the part field and click EXECUTE. You may need to allow your Google account to access the API and should get a JSON response.
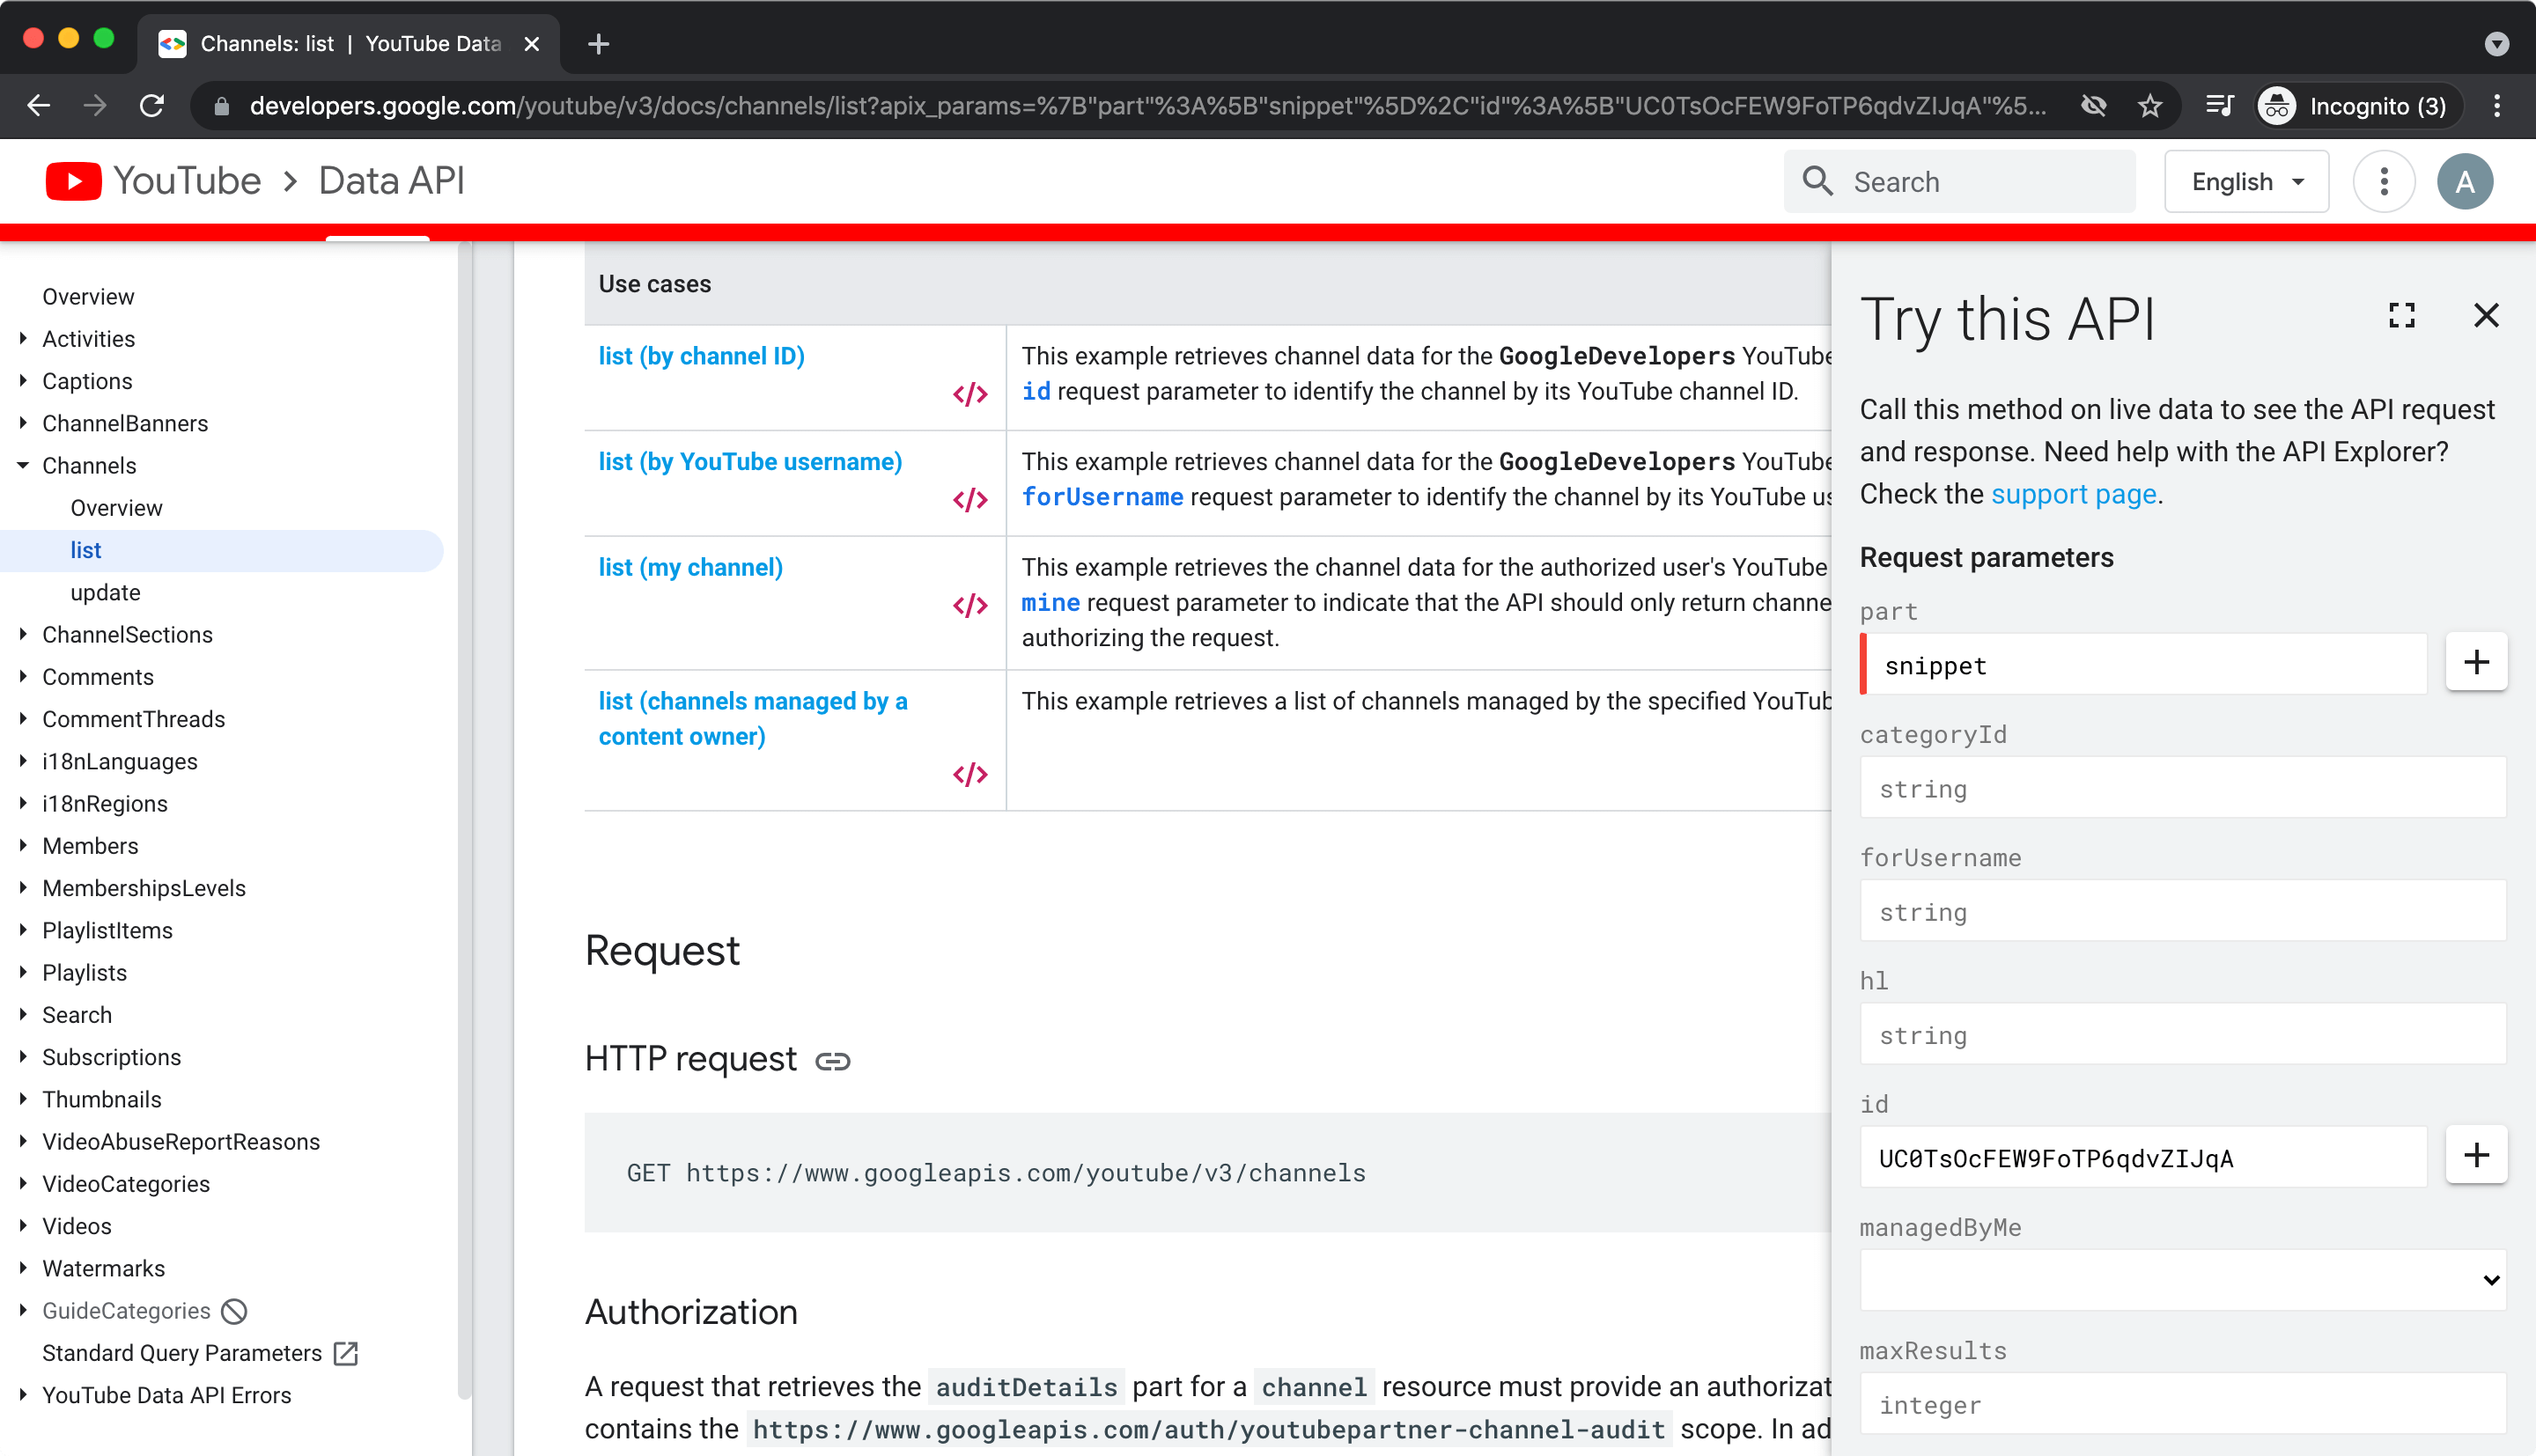
The fields we are interested in (title and thumbnails) are indeed in the snippet part.
Now let’s query the same information in our Next.js app.
Loading YouTube channel info
For loading anything from the YouTube API, we first need to setup our API key as an environment variable.
Environment Variables
Next.js has built-in support for loading environment variables from .env.local into process.env.
Create a .env.local file in the root directory:
YOUTUBE_API_KEY=Your YouTube API key
This loads process.env.YOUTUBE_API_KEY into the Node.js environment automatically allowing you to use them in Next.js data fetching methods and API routes.
Function getChannelInfo
Next we create a file lib/youtube.js for our YouTube specific functions. We start with the function getChannelInfo.
const YOUTUBE_HOST = "https://youtube.googleapis.com";

export async function getChannelInfo(channelId) {
  try {
    const response = await fetch(
      `${YOUTUBE_HOST}/youtube/v3/channels?part=snippet,contentDetails&id=${channelId}&key=${process.env.YOUTUBE_API_KEY}`
    );

    const data = await response.json();

    return data;
  } catch (err) {
    console.log(err);
  }

  return null;
}
This function queries the YouTube API Channels endpoint and takes the channelId as a parameter.
Next.js data fetching
There are multiple possibilities with Next.js to load the data from YouTube. We could load it client side, but I prefer to load the data directly on the server, so there is no need to show any loading indicators.
We therefor change our index.js file to the following:
import { getChannelInfo } from "lib/youtube";

export default function Home() {
  return <h1>Best Kitesurf YouTube Channels</h1>;
}

export async function getServerSideProps() {
  const channels = [
    "UC0TsOcFEW9FoTP6qdvZIJqA", // Kevin Langeree
    "UCmzxts0YGES5tN-oJ9abTQg", // Kai Lenny
    "UCueYbWdMJ-u7xb7gKE2B2Qw", // Ruben Lenten
    "UCpvzntBAE9Yq3NTOVOdEpqQ", // Aaron Hadlow
  ];

  const channelInfos = await Promise.all(
    channels.map((channelId) => getChannelInfo(channelId))
  );

  console.log(JSON.stringify(channelInfos, null, 2));

  return {
    props: {
      channelInfos,
    },
  };
}
We import our previously created function getChannelInfo and export the Next.js data fetching method getServerSideProps. getServerSideProps is called on each page request by Next.js and the returned data is passed as props to the page component.
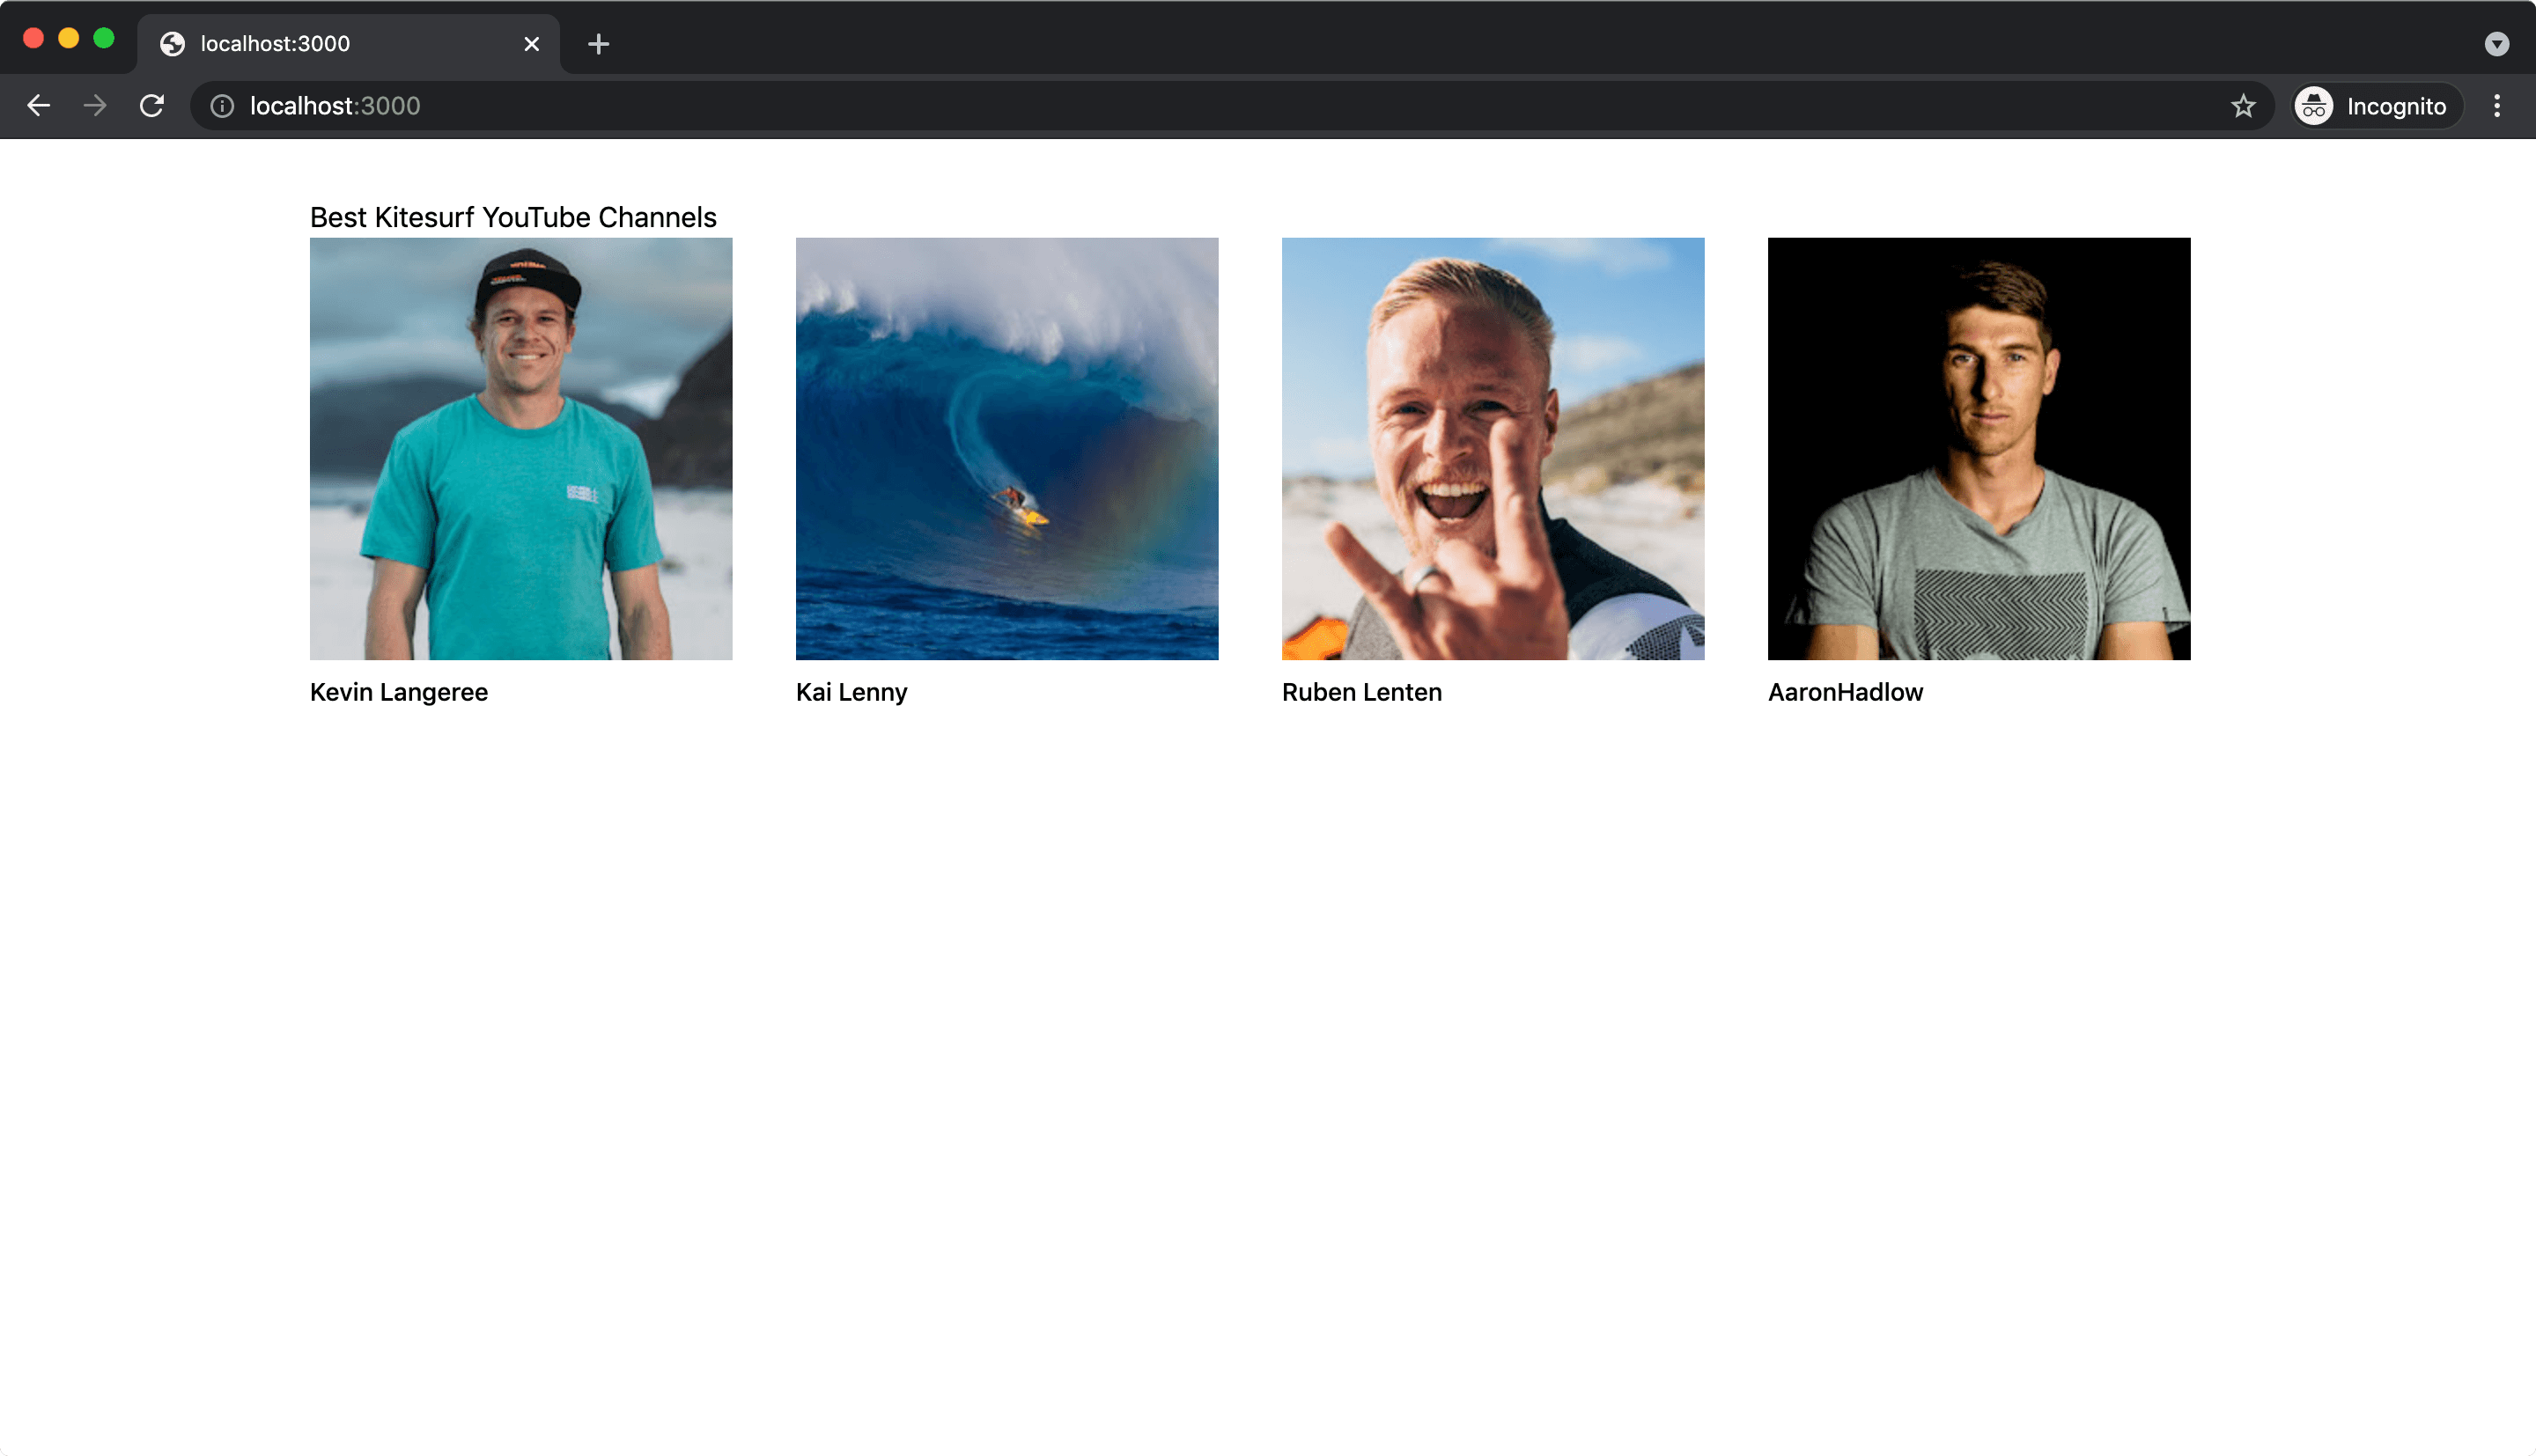
We load the channel info of four Kitesurfer’s YouTube channels and pass it as the prop channelInfos to our component.
Displaying YouTube channels in grid
We want to display the best Kitesurf YouTube channels in a grid with a thumbnail and the title of the channel. We get this information from the passed channelInfos prop.
import { getChannelInfo } from "lib/youtube";
import Link from "next/link";

export default function Home({ channelInfos }) {
  return (
    <div className="mx-auto max-w-6xl p-4 lg:p-8">
      <h1>Best Kitesurf YouTube Channels</h1>
      <div className="grid grid-cols-2 sm:grid-cols-3 lg:grid-cols-4 gap-4">
        {channelInfos.map((channelInfo) => {
          const {
            id,
            snippet: { title, thumbnails },
          } = channelInfo.items[0];

          return (
            <Link key={id} href={`/channel/${id}`}>
              <a>
                <img src={thumbnails.medium?.url} />
                <div className="text-sm font-medium mt-2">
                  {title}
                </div>
              </a>
            </Link>
          );
        })}
      </div>
    </div>
  );
}

...
Tailwind CSS’s utility classes allow us to quickly have a good looking responsive grid.
Optimizing images with next/image
As the YouTube API also provides height and width for each thumbnail we can easily swap the img tag with the <Image /> component exported by next/image and get automatic image optimizations.
We change our code to the following:
import Image from "next/image";

...

<Image
  src={thumbnails.medium?.url}
  height={thumbnails.medium?.height}
  width={thumbnails.medium?.width}
/>

...
To enable Image Optimization for images hosted on an external website we need to specify which domains are allowed to be optimized.
We create our next.config.js in our root folder if it doesn’t exist already and add two domains used by YouTube to host images.
module.exports = {
  images: {
    domains: ["yt3.ggpht.com", "i.ytimg.com"],
  },
};
Channel detail page
Dynamic Routes
Next.js supports file based dynamic routes. We use these dynamic routes for our channel detail page.
Channels are available at e.g. /channel/UC0TsOcFEW9FoTP6qdvZIJqA . To support such URL’s we need to create a file channel/[id].js.
export default function Channel({ id }) {
  return <h1>{id}</h1>;
}

export async function getServerSideProps({ query }) {
  const { id } = query;

  // TODO fetch videos

  return {
    props: {
      id,
    },
  };
}
The channel ID is passed to our page as query.id, because we named the parameter between the square brackets id.
Fetch all videos from channel
We want to display all videos from a channel. But how do we get them? In our getChannelInfo function we not only loaded the snippet, but also the contentDetails part of the channel. You might wonder why, because we haven’t used it so far. But on the contentDetails part there is a uploads playlist id which we can use to load all videos.
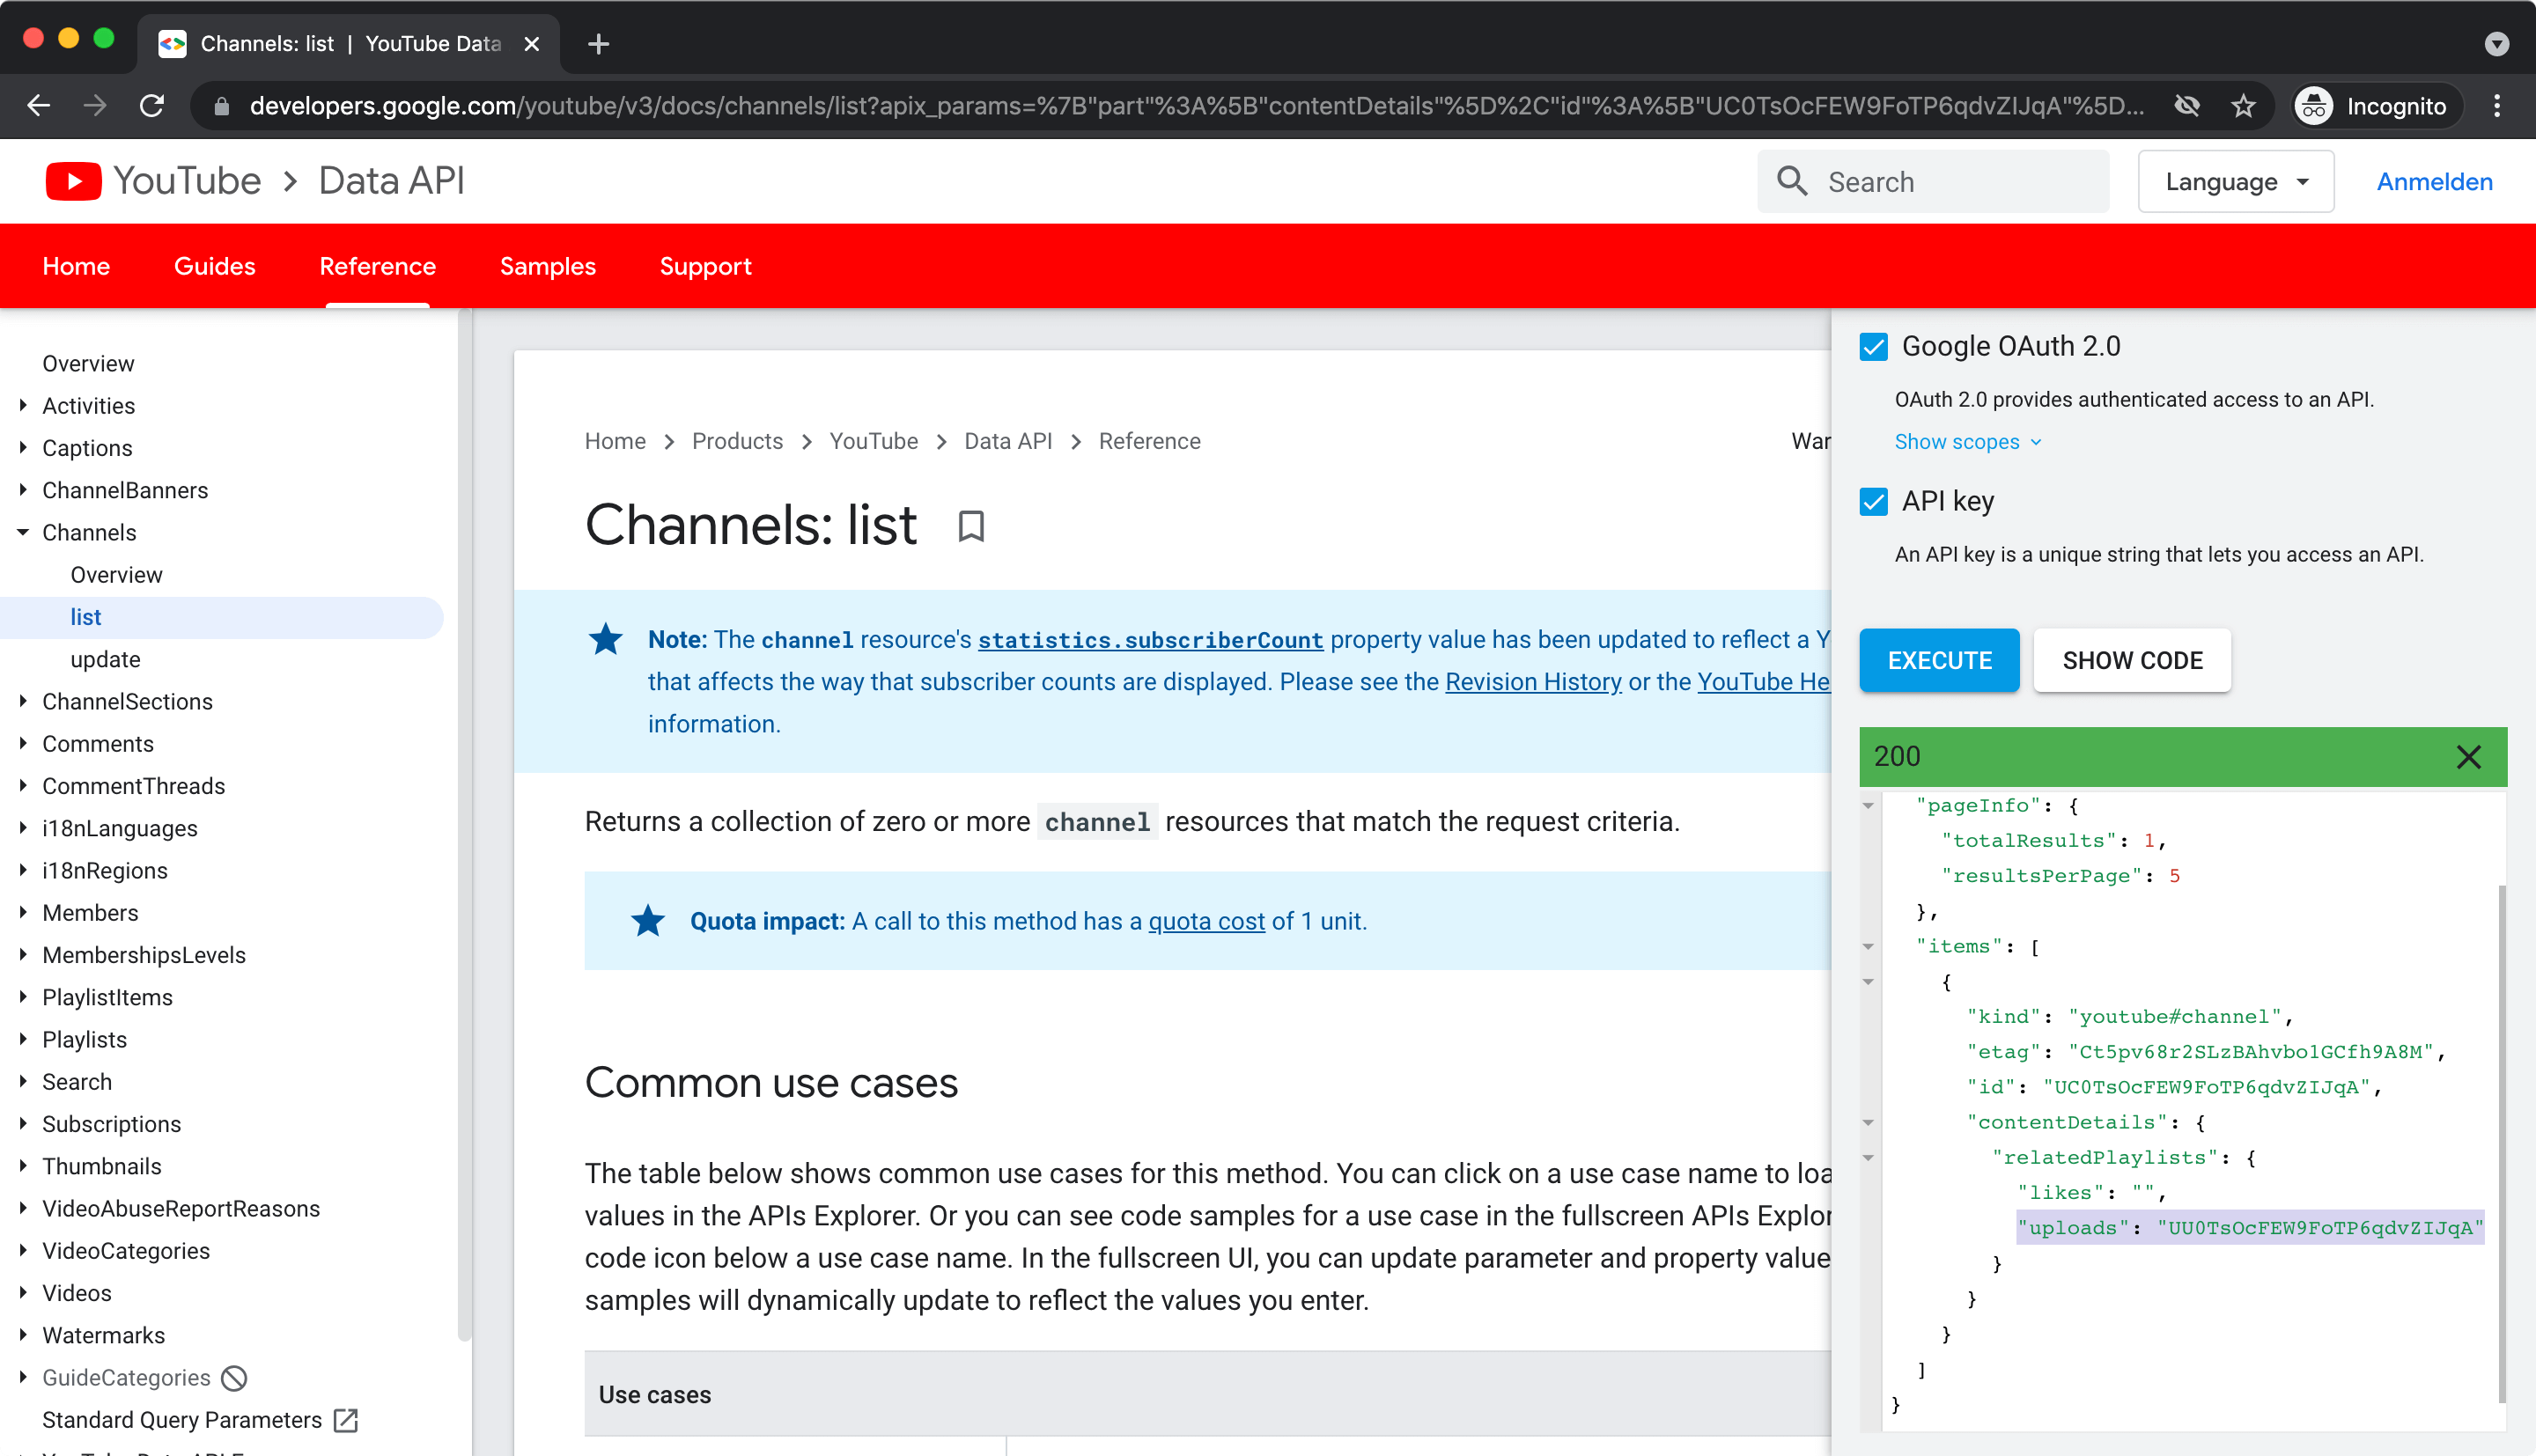
It’s usually (always?) the same as the channel id. But to be sure we get it from our channel info response.
getAllPlaylistItems function
To load videos from a playlist we use the PlaylistItems endpoint and need to pass it the playlistId. With the maxResults parameter we can load up to 50 videos. The default value is 5.
If we want to load more than 50 we need to use the parameter pageTokento query a specific page. In an API response, the nextPageToken and prevPageToken properties identify other pages that could be retrieved. So to load more we need to check if we get a nextPageToken back and if yes query the endpoint again and pass it to the parameter pageToken.
In our function getAllPlaylistItems below we have implemented just that.
export async function getAllPlaylistItems(playlistId) {
  try {
    const playlistItemsUrl = `${YOUTUBE_HOST}/youtube/v3/playlistItems?part=snippet&maxResults=50&playlistId=${playlistId}&key=${process.env.YOUTUBE_API_KEY}`;
    let playlistItems = [];

    let response = await fetch(playlistItemsUrl);
    let data = await response.json();

    playlistItems = data.items;

    while (data.nextPageToken) {
      response = await fetch(
        `${playlistItemsUrl}&pageToken=${data.nextPageToken}`
      );

      data = await response.json();

      playlistItems = playlistItems.concat(data.items);
    }

    return playlistItems;
  } catch (err) {
    console.log(err);
  }

  return null;
}
Now let’s call this function in our channel detail page.
export async function getServerSideProps({ query }) {
  const { id } = query;

  const info = await getChannelInfo(id);

  if (info.pageInfo.totalResults === 0) {
    return {
      notFound: true,
    };
  }

  const playlistId = info.items[0].contentDetails.relatedPlaylists.uploads;
  const title = info.items[0].snippet.title;
  const videos = await getAllPlaylistItems(playlistId);

  return {
    props: {
      title,
      videos,
    },
  };
}
We pass the channel ID to our function getChannelInfo and check if we get any information back. If not the channel ID doesn’t exist and we return a 404 not found page.
If it exists we get the channel title and the uploads playlist ID from the response and use the latter to get the channel’s videos with our function getAllPlaylistItems.
We both pass the title and the videos to our page component.
Displaying channel videos
Similar to our channel overview page we display the channel’s videos in a responsive grid.
Change our page to this:
import { formatDistance } from "date-fns";
import { getChannelInfo, getAllPlaylistItems } from "lib/youtube";
import Image from "next/image";

export default function Channel({ title, videos }) {
  return (
    <div>
      <div className="mx-auto max-w-6xl p-4 lg:p-8">
        <h1 className="text-2xl sm:text-3xl lg:text-4xl my-4 font-bold">
          {title}
        </h1>
        <div className="grid grid-cols-2 sm:grid-cols-3 lg:grid-cols-4 gap-4">
          {videos.map(
            ({
              snippet: {
                title,
                publishedAt,
                thumbnails,
                resourceId: { videoId },
              },
            }) => {
              return (
                <a
                  key={videoId}
                  href={`https://www.youtube.com/watch?v=${videoId}`}
                >
                  <Image
                    src={thumbnails.medium?.url}
                    height={thumbnails.medium?.height}
                    width={thumbnails.medium?.width}
                  />
                  <div className="flex flex-col justify-between mt-2">
                    <div className="text-sm font-medium">
                      {title}
                    </div>
                    <div className="text-gray-700 text-xs mt-2">
                      {formatDistance(new Date(publishedAt), new Date())}
                    </div>
                  </div>
                </a>
              );
            }
          )}
        </div>
      </div>
    </div>
  );
}

export async function getServerSideProps({ query }) { ... }
To format the publishedAt date we need to install date-fns a great JavaScript date utility library by running:
npm install date-fns
# or
yarn add date-fns
As on YouTube we display how long ago a video was published instead of the exact date.
By clicking a video we open the video on YouTube. In the next step we change our code to let users play the videos directly on our page.
Playing videos on page
Until now we have just displayed the video thumbnails. To embed YouTube videos we need to use iFrames and one way to make them responsive is with the @tailwindcss/aspect-ratio plugin.
Tailwind Aspect Ratio Plugin
Install it by running:
npm install @tailwindcss/aspect-ratio # or
yarn add @tailwindcss/aspect-ratio
Then add the plugin to your tailwind.config.js file:
module.exports = {
  theme: {
    // ...
  },
  plugins: [
    require('@tailwindcss/aspect-ratio'),
    // ...
  ],
}
The plugin provides CSS classes aspect-w-16 and aspect-h-9 which we can use to make the YouTube embed responsive and the right aspect ratio.
<div className="aspect-w-16 aspect-h-9">
  <iframe
    src={`https://www.youtube.com/embed/${videoId}?autoplay=1`}
    frameBorder="0"
    allow="accelerometer; autoplay; clipboard-write; encrypted-media; gyroscope; picture-in-picture"
    allowFullScreen
  ></iframe>
</div>
Embed video
We display the video inline together with the title of the video like this:
import classNames from "classnames";
import { formatDistance } from "date-fns";
import { getChannelInfo, getAllPlaylistItems } from "lib/youtube";
import Image from "next/image";

export default function Channel({ title, videos }) {
  const currentVideoIndex = 0;
  return (
    <div>
      <div className="mx-auto max-w-6xl p-4 lg:p-8">
        <h1 className="text-2xl sm:text-3xl lg:text-4xl my-4 font-bold">
          {title}
        </h1>
        <div
          className={classNames("bg-gray-200 pt-20 p-12 mb-4 relative", {
            hidden: currentVideoIndex === null,
          })}
        >
          {currentVideoIndex !== null && (
            <>
              <div className="aspect-w-16 aspect-h-9">
                <iframe
                  src={`https://www.youtube.com/embed/${videos[currentVideoIndex].snippet.resourceId.videoId}?autoplay=1`}
                  frameBorder="0"
                  allow="accelerometer; autoplay; clipboard-write; encrypted-media; gyroscope; picture-in-picture"
                  allowFullScreen
                ></iframe>
              </div>
              <h2 className="text-3xl font-medium my-6">
                {videos[currentVideoIndex].snippet.title}
              </h2>
            </>
          )}
        </div>
        <div className="grid grid-cols-2 sm:grid-cols-3 lg:grid-cols-4 gap-4">

...
For the moment we hardcoded displaying the first video with currentVideoIndex = 0.
Another handy library we are using is classnames to make it easier to add classes depending on a state or value. In our case we use it to hide the embedded video if our currentVideoIndex is null.
To install it run:
npm install classnames
#or
yarn add classnames
We get our videoId with videos[currentVideoIndex].snippet.resourceId.videoId and by adding autoplay=1 to the URL we directly start playing the YouTube video.
We also want to display the video description below the video and title. It would be nice if links in the description would be clickable and properly styled. We need to install two node modules to achieve that.
Converting plain-text URLs to HTML
To make URLs in the text clickable we use a node module called linkifyjs, a JavaScript plugin for finding URLs in plain-text and converting them to HTML links.
Run:
npm install linkifyjs
#or
yarn add linkifyjs
Styling URLs as links
To style URLs properly we need to install the @tailwindcss/typography plugin which provides prose classes to add sensible typography styles to any vanilla HTML.
Install it by running:
npm install @tailwindcss/typography
#or
yarn add @tailwindcss/typography
and add it to the tailwind.config.js:
module.exports = {
  theme: {
    // ...
  },
  plugins: [
    require('@tailwindcss/typography'),
    // ...
  ],
}
Adding description
Now we are able to display the description with the following code snippet:
import linkifyHtml from "linkifyjs/html";
...

<p
  className="prose"
  dangerouslySetInnerHTML={{
    __html: linkifyHtml(
      videos[currentVideoIndex].snippet.description?.replace(/\n/g, " <br />")
    ),
  }}
></p>
...
Next let’s implement selecting videos by clicking the thumbnails.
Selecting videos
We start by creating a function selectVideoByIndex and change our variable currentVideoIndex to a useState hook.
const [currentVideoIndex, setCurrentVideoIndex] = useState(null);

function selectVideoByIndex(index) {
  if (index > videos.length - 1) {
    setCurrentVideoIndex(0);
  } else {
    if (index < 0) {
      setCurrentVideoIndex(videos.length - 1);
    } else {
      setCurrentVideoIndex(index);
    }
  }
}
The function does nothing more than setting our currentVideoIndex and if the index is too high it sets it to 0 and if it is negative it sets it to the latest. This allows us to then implement selecting the next or previous video.
We now change the thumbnail link to a button to call our function selectVideoByIndex.
<div className="grid grid-cols-2 sm:grid-cols-3 lg:grid-cols-4 gap-4">
  {videos.map(
    (
      {
        snippet: {
          title,
          publishedAt,
          thumbnails,
          resourceId: { videoId },
        },
      },
      index
    ) => {
      return (
        <button
          key={videoId}
          className="text-left"
          onClick={() => selectVideoByIndex(index)}
        >
          <Image
            src={thumbnails.medium?.url}
            height={thumbnails.medium?.height}
            width={thumbnails.medium?.width}
          />
          <div className="flex flex-col justify-between mt-2">
            <div className="line-clamp-2 text-sm font-medium">{title}</div>
            <div className="text-gray-700 text-xs mt-2">
              {formatDistance(new Date(publishedAt), new Date())}
            </div>
          </div>
        </button>
      );
    }
  )}
</div>
If we click a video it’s now playing inline. But if we scroll down to a thumbnail below and click the video, the video starts playing, but we don’t see it, because we are not scrolling to top. Let’s fix that by adding window.scrollTo({ left: 0, top: 0, behavior: "smooth" }); to our selectVideoByIndex function to scroll to top of page whenever we click a video thumbnail.
The function selectVideoByIndex now looks like this:
function selectVideoByIndex(index) {
  if (index > videos.length - 1) {
    setCurrentVideoIndex(0);
  } else {
    if (index < 0) {
      setCurrentVideoIndex(videos.length - 1);
    } else {
      setCurrentVideoIndex(index);
    }
  }
  window.scrollTo({ left: 0, top: 0, behavior: "smooth" });
}
Play next and previous videos
We add an absolutely positioned small navigation for the controls to play previous, play next and close video. We get the icons from heroicons as they are beautifully designed and you can directly copy JSX. Our controls consist of the icons chevron-left, chevron-right and x.
Add the following code for our controls:
...

<div
  className={classNames("bg-gray-200 pt-20 p-12 mb-4 relative", {
    hidden: currentVideoIndex === null,
  })}
>
  <div className="absolute top-0 right-0">
    <button
      className="p-2 bg-gray-300 hover:bg-gray-400 focus:bg-gray-400"
      type="button"
      onClick={() => selectVideoByIndex(currentVideoIndex - 1)}
    >
      <svg
        xmlns="http://www.w3.org/2000/svg"
        className="h-5 w-5"
        fill="none"
        viewBox="0 0 24 24"
        stroke="currentColor"
      >
        <path
          strokeLinecap="round"
          strokeLinejoin="round"
          strokeWidth={2}
          d="M15 19l-7-7 7-7"
        />
      </svg>
    </button>
    <button
      className="p-2 bg-gray-300 hover:bg-gray-400 focus:bg-gray-400"
      type="button"
      onClick={() => selectVideoByIndex(currentVideoIndex + 1)}
    >
      <svg
        xmlns="http://www.w3.org/2000/svg"
        className="h-5 w-5"
        fill="none"
        viewBox="0 0 24 24"
        stroke="currentColor"
      >
        <path
          strokeLinecap="round"
          strokeLinejoin="round"
          strokeWidth={2}
          d="M9 5l7 7-7 7"
        />
      </svg>
    </button>
    <button
      className="p-2 bg-gray-300 hover:bg-gray-400 focus:bg-gray-400"
      type="button"
      onClick={() => setCurrentVideoIndex(null)}
    >
      <svg
        xmlns="http://www.w3.org/2000/svg"
        className="h-5 w-5"
        fill="none"
        viewBox="0 0 24 24"
        stroke="currentColor"
      >
        <path
          strokeLinecap="round"
          strokeLinejoin="round"
          strokeWidth={2}
          d="M6 18L18 6M6 6l12 12"
        />
      </svg>
    </button>
  </div>
  {currentVideoIndex !== null && (
  <>
    <div className="aspect-w-16 aspect-h-9">
    <iframe

  ...
With that our channel detail page is complete, but we still miss an easy way to navigate back to the channel overview page. So let’s add a global navigation.
Global navigation bar
First we create a new component components/nav.js for our navbar. Our navbar consists only of a link back to our homepage.
import Link from "next/link";

export default function Nav() {
  return (
    <nav className="p-4 lg:p-8">
      <Link href="/">
        <a className="font-bold">Best Kitesurf YouTube Channels</a>
      </Link>
    </nav>
  );
}
We then add our navbar to our _app.js file.
import Nav from "components/nav";
import "tailwindcss/tailwind.css";

function MyApp({ Component, pageProps }) {
  return (
    <>
      <Nav />
      <Component {...pageProps} />
    </>
  );
}

export default MyApp;
And remove the headline Best Kitesurf YouTube Channels from our index.js page, as we only need it once.
<h1>Best Kitesurf YouTube Channels</h1>
To finish our Best Kitesurf YouTube Channels website we can add some more great YouTube channels.
...

export async function getServerSideProps() {
  const channels = [
    "UC0TsOcFEW9FoTP6qdvZIJqA", // Kevin Langeree
    "UCmzxts0YGES5tN-oJ9abTQg", // Kai Lenny
    "UCueYbWdMJ-u7xb7gKE2B2Qw", // Ruben Lenten
    "UCpvzntBAE9Yq3NTOVOdEpqQ", // Aaron Hadlow
    "UCa4U3I1RkE1bVHKQXz1azDw", // Tom Court
    "UCY6tC9P0Vf1uMxcMB2fDn8g", // Sam Light
    "UCbexBMlbpOKHFIdT-8ZeeGA", // Jake Kelsick
    "UCe_SfX2ZD8pRoyE7atPNu2g", // Jeremie Tronet
    "UCR4-Msn347sPVPxdbBXNaZQ", // Gisela Pulido Borrell
    "UCr8Yh0AcsZqsDXl2QKTV7lA", // Jalou Langeree
    "UCPqFFxV6vhkNso2XeDdALOQ", // Bruna Kajiya
    "UCOXq-tcD4X_QmksdqWsfIrA", // Hannah Whiteley
    "UCSRqn7YaHN5s5jIcf9qTgyQ", // Rita Arnaus
  ];

...
Follow along as I'm building yabby.page in public.